- ASP.NET MVC 5 with ADO.Net Connectivity
- CRUD – CREATE, READ, UPDATE and DELETE Operation
In this article you are going to learn how to Insert, Update and Delete Records in ASP.NET MVC 5 without using heavy entity framework. This article uses pure ADO.Net commands to work with SQL database. You will learn MVC 5 application with ado.net connectivity with complete pictorial guide and step by step examples. Once you complete this article, I promise, you will be able to write your own customize code in MVC 5. If you are beginners or trying to learn MVC, then don't skip this tutorial, because this article contains complete programming example with screen shot. As I understand the need of beginners that they require complete programming example instead of part of the code.
Let's Start ASP.NET MVC 5 with CRUD Operation
In this example, I am going to create a simple student registration form in MVC5 using CRUD (Create, Read, Update and Delete) Operation. In this tutorial, I haven’t used heavy entity framework and gives you a way to write transparent ADO.NET Connectivity.
I have divided the entire article into following parts.2. Creating Model Classes.
3. Creating Controller
4. Creating Database, Table and Store Procedure
5. Adding Connection String to Web.Config File.
6. Creating a class file for handling all the databases operations.
7. Adding Action Method in Controller.
8. Creating Partial View from Action Method
9. Configure RouteConfig.cs file
10. Run your Project
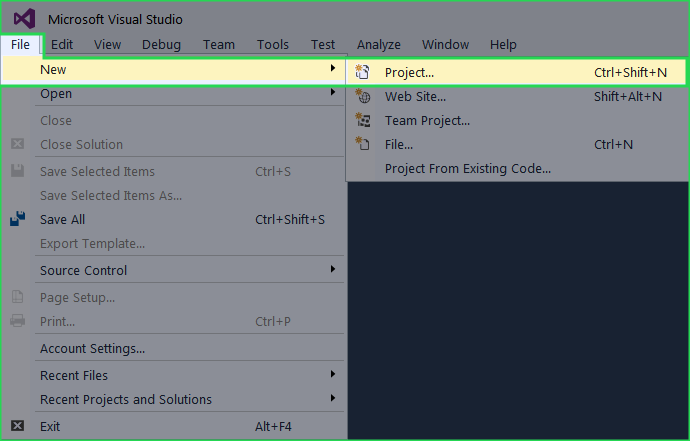
1. Open Visual Studio 2015. Click on File New Project.
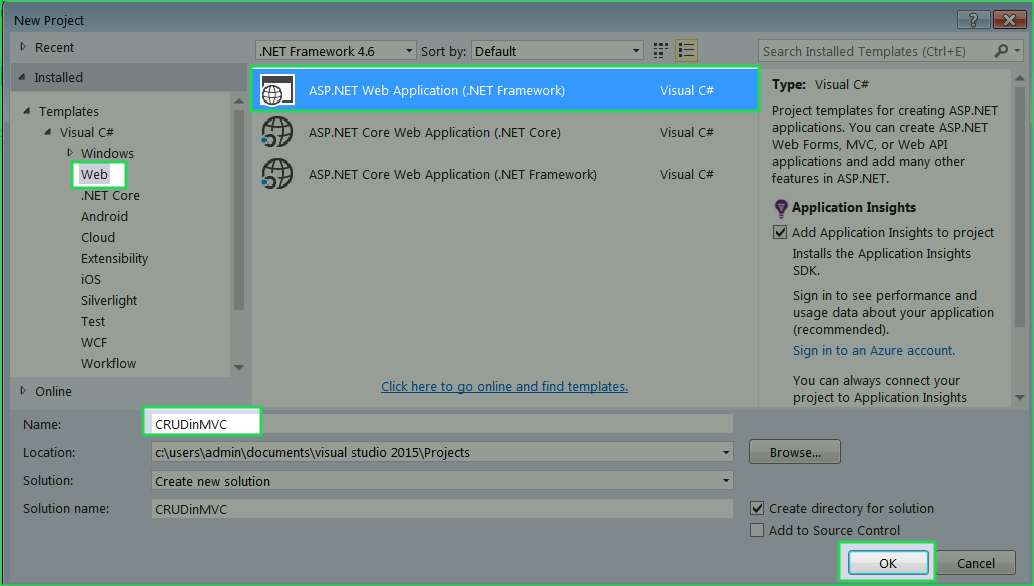
2. Select Web in the template section and select ASP.NET Web Application. Give name CRUDinMVC and click OK.
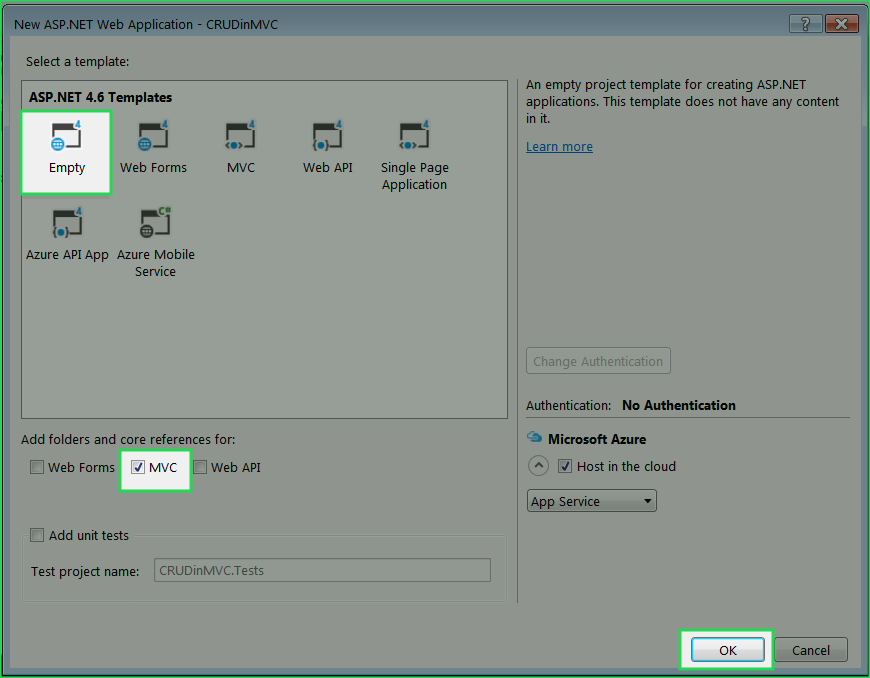
3. A template windows will open. Select Empty template and check MVC checkbox as described in the given picture.
4. Your project will open for develop. If you see AZURE Hosting window before opening the project, gently cancel it.
StudentModel.cs.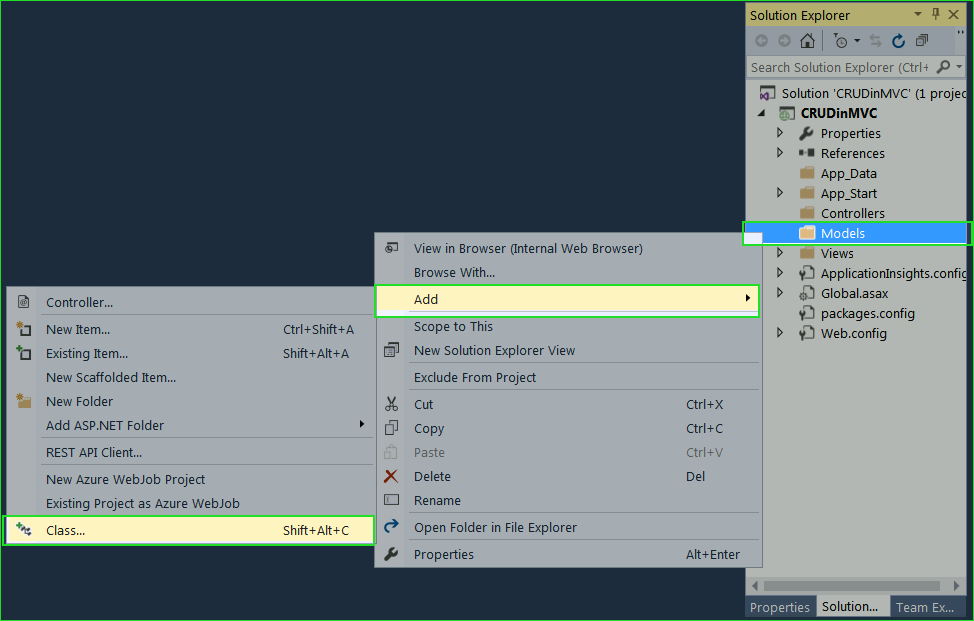
2. Your
StudentModel.cs class should be look like this code snippets.
using System.ComponentModel.DataAnnotations;

namespace CRUDinMVC.Models
{
    public class StudentModel
    {
        [Display(Name = "Id")]
        public int Id { get; set; }

        [Required(ErrorMessage = "First name is required.")]
        public string Name { get; set; }

        [Required(ErrorMessage = "City is required.")]
        public string City { get; set; }

        [Required(ErrorMessage = "Address is required.")]
        public string Address { get; set; }
    }
}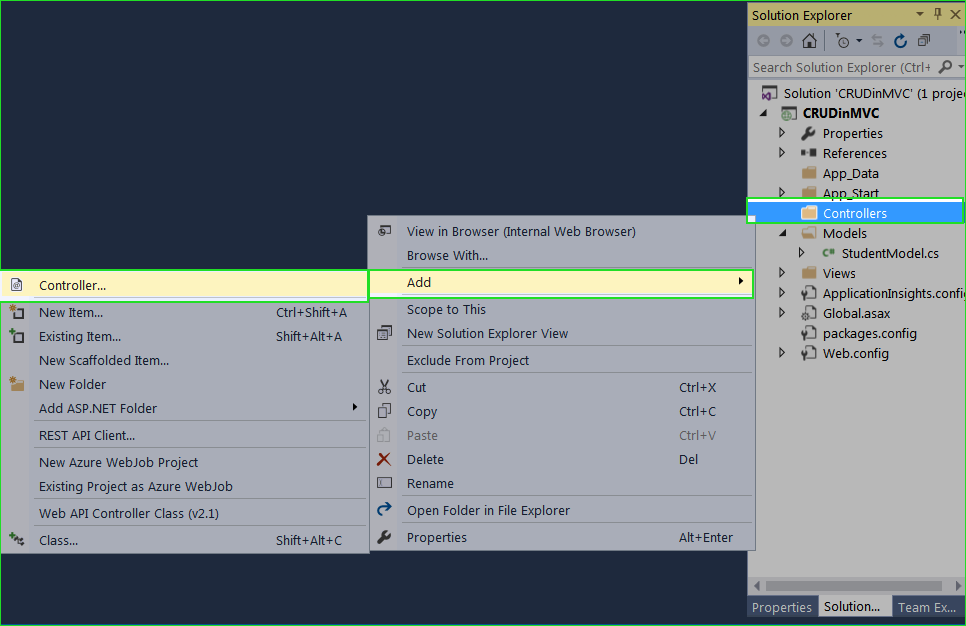
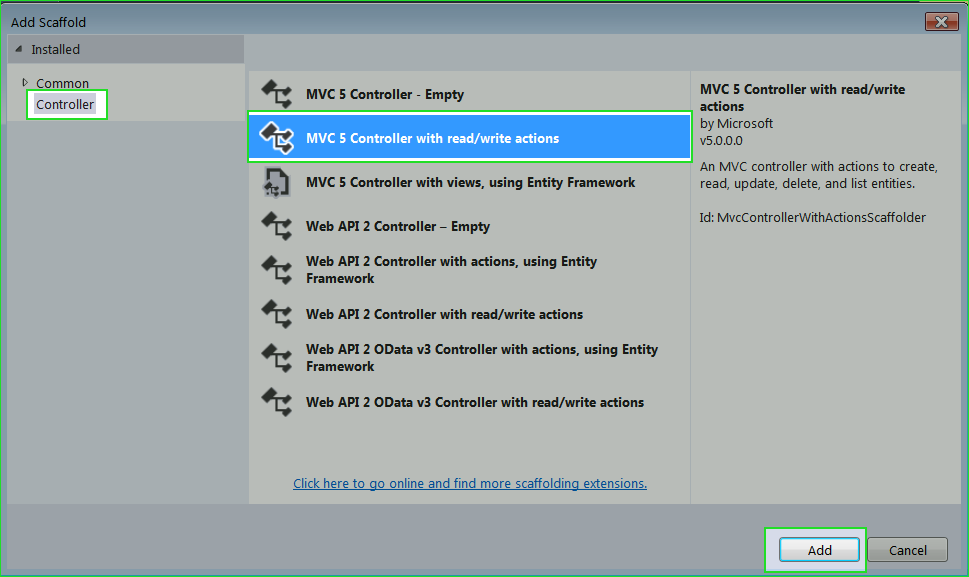
2. Scaffold window will open. Here, choose MVC 5 Controller with read/write actions and click Add button.
3. Give name StudentController and click Add.

2. Right Click on Data Connections Create New SQL Server Database.
3. Create
StudentDB database as the picture below.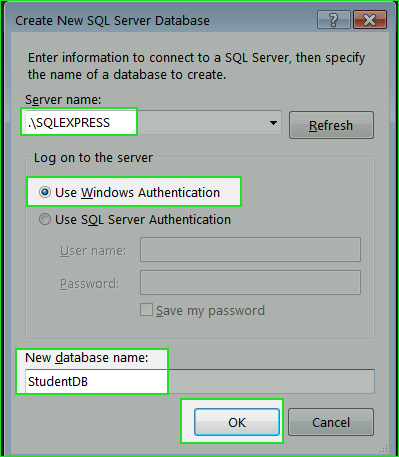
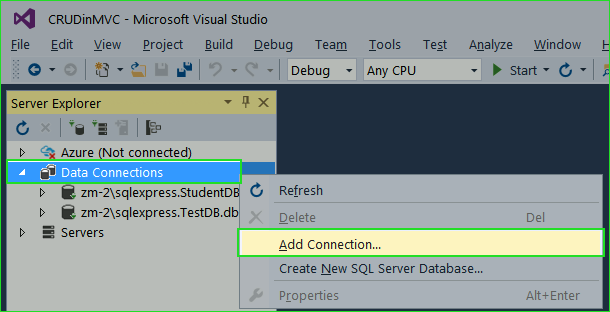
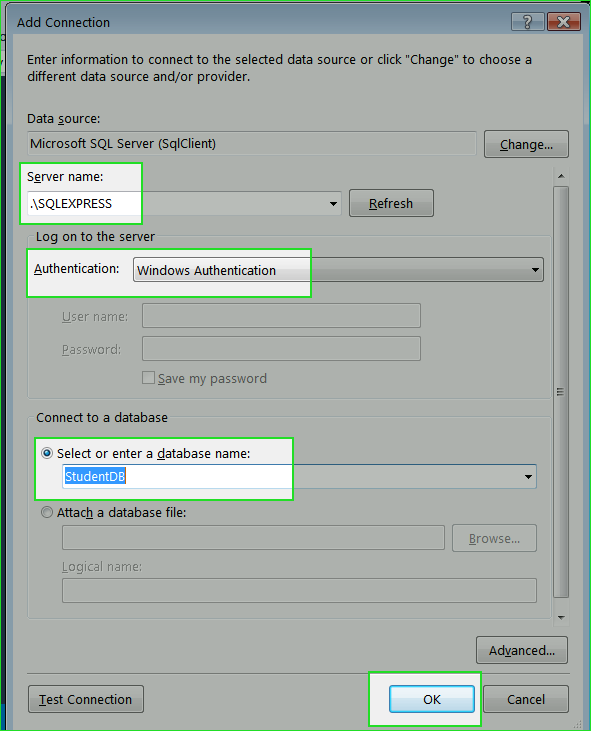
4. If you have already a database then you can make connection with existing database. Right Click on Data Connections Add Connection
5. Select database as picture below
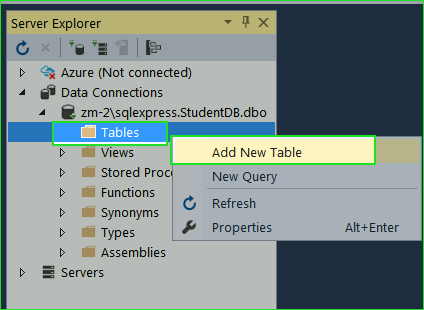
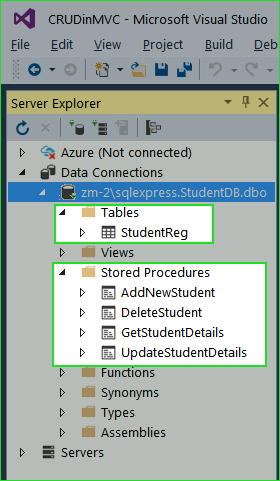
StudentReg TABLEStudentReg in database according to models. Expand StudentDB database in Server Explorer and Right Click on Table and then select Add New Table.
2. Make Table exactly the same as described in the picture. Go to Table Properties and must set Id in Identity column and StudentReg in Name Column.
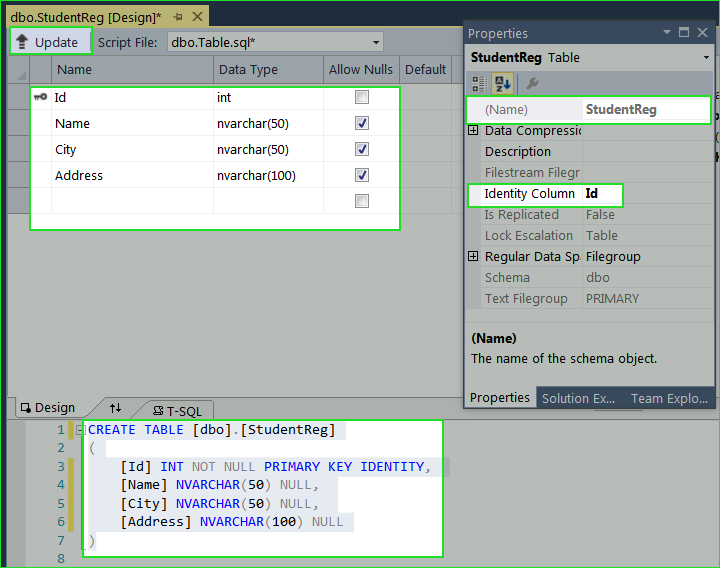
3. Table Scripts
CREATE TABLE [dbo].[StudentReg]
(
	[Id] INT NOT NULL PRIMARY KEY IDENTITY,
    [Name] NVARCHAR(50) NULL,
    [City] NVARCHAR(50) NULL,
    [Address] NVARCHAR(100) NULL
)
4. After finishing table designing click on Update button to save table.
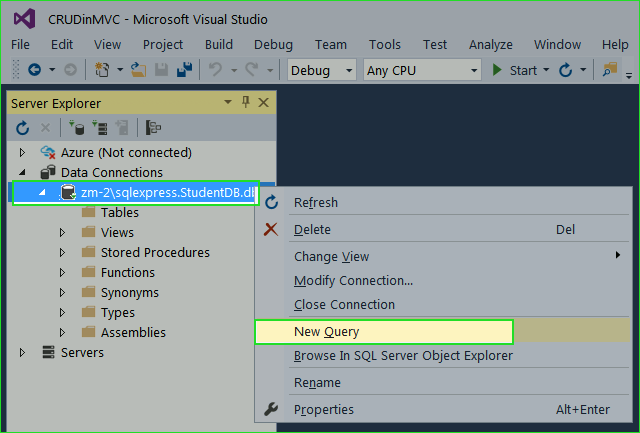
CRUD – Create, Read, Update and Delete Operation.Open New Query Window. Right Click on database name in Server Explorer and select New Query. Now, Paste following code snippets one by one and execute code by pressing Ctrl + Shift + E or clicking on Execute icon on the top left corner of query window.
1. Insert Records – Store Procedure
Create procedure [dbo].[AddNewStudent]
(
   @Name nvarchar (50),
   @City nvarchar (50),
   @Address nvarchar (100)
)
as
begin
   Insert into StudentReg values(@Name,@City,@Address)
End

2. View Added Records – Store Procedure
Create Procedure [dbo].[GetStudentDetails]
as
begin
   select * from StudentReg
End
3. Update Records – Store Procedure
Create procedure [dbo].[UpdateStudentDetails]
(
   @StdId int,
   @Name nvarchar (50),
   @City nvarchar (50),
   @Address nvarchar (100)
)
as
begin
   Update StudentReg
   set Name=@Name,
   City=@City,
   Address=@Address
   where Id=@StdId
End
4. Delete Records – Store Procedure
Create procedure [dbo].[DeleteStudent]
(
   @StdId int
)
as
begin
   Delete from StudentReg where Id=@StdId
End
After Creating all Store Procedure your Server Explorer will look like:
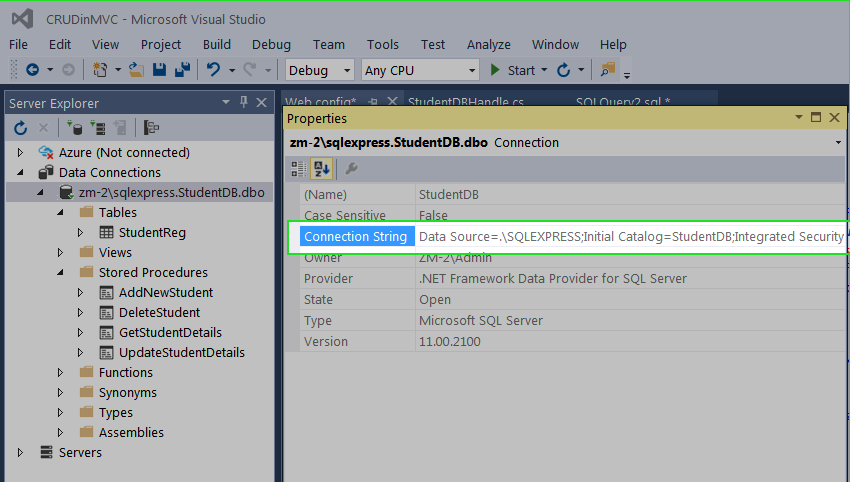
1. Add Connection String in Web.config file. You can find connection string in the database properties. Right click on Database Name and Select Properties. Copy Connection String and keep it.
2. Open Root Web.config file and paste following code just before
</Configuratin>.
  <connectionStrings>
    <add name="StudentConn" connectionString="Data Source=.\SQLEXPRESS;Initial Catalog=StudentDB;Integrated Security=True;Pooling=False"/>
  </connectionStrings>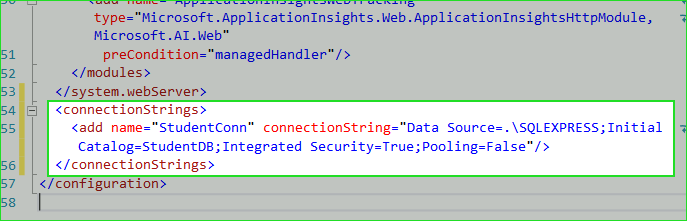
StudentDBHandle.cs
2. Now paste following code in this file.
using System;
using System.Collections.Generic;
using System.Data;
using System.Data.SqlClient;
using System.Configuration;

namespace CRUDinMVC.Models
{
    public class StudentDBHandle
    {
        private SqlConnection con;
        private void connection()
        {
            string constring = ConfigurationManager.ConnectionStrings["studentconn"].ToString();
            con = new SqlConnection(constring);
        }

        // **************** ADD NEW STUDENT *********************
        public bool AddStudent(StudentModel smodel)
        {
            connection();
            SqlCommand cmd = new SqlCommand("AddNewStudent", con);
            cmd.CommandType = CommandType.StoredProcedure;

            cmd.Parameters.AddWithValue("@Name", smodel.Name);
            cmd.Parameters.AddWithValue("@City", smodel.City);
            cmd.Parameters.AddWithValue("@Address", smodel.Address);

            con.Open();
            int i = cmd.ExecuteNonQuery();
            con.Close();

            if (i >= 1)
                return true;
            else
                return false;
        }

        // ********** VIEW STUDENT DETAILS ********************
        public List<StudentModel> GetStudent()
        {
            connection();
            List<StudentModel> studentlist = new List<StudentModel>();

            SqlCommand cmd = new SqlCommand("GetStudentDetails", con);
            cmd.CommandType = CommandType.StoredProcedure;
            SqlDataAdapter sd = new SqlDataAdapter(cmd);
            DataTable dt = new DataTable();

            con.Open();
            sd.Fill(dt);
            con.Close();

            foreach(DataRow dr in dt.Rows)
            {
                studentlist.Add(
                    new StudentModel
                    {
                        Id = Convert.ToInt32(dr["Id"]),
                        Name = Convert.ToString(dr["Name"]),
                        City = Convert.ToString(dr["City"]),
                        Address = Convert.ToString(dr["Address"])
                    });
            }
            return studentlist;
        }

        // ***************** UPDATE STUDENT DETAILS *********************
        public bool UpdateDetails(StudentModel smodel)
        {
            connection();
            SqlCommand cmd = new SqlCommand("UpdateStudentDetails", con);
            cmd.CommandType = CommandType.StoredProcedure;

            cmd.Parameters.AddWithValue("@StdId", smodel.Id);
            cmd.Parameters.AddWithValue("@Name", smodel.Name);
            cmd.Parameters.AddWithValue("@City", smodel.City);
            cmd.Parameters.AddWithValue("@Address", smodel.Address);

            con.Open();
            int i = cmd.ExecuteNonQuery();
            con.Close();

            if (i >= 1)
                return true;
            else
                return false;
        }

        // ********************** DELETE STUDENT DETAILS *******************
        public bool DeleteStudent(int id)
        {
            connection();
            SqlCommand cmd = new SqlCommand("DeleteStudent", con);
            cmd.CommandType = CommandType.StoredProcedure;

            cmd.Parameters.AddWithValue("@StdId", id);

            con.Open();
            int i = cmd.ExecuteNonQuery();
            con.Close();

            if (i >= 1)
                return true;
            else
                return false;
        }
    }
}a.
Index() - Showing All Student Detailsb.
Create() - Adding New Studentc.
Edit () - Edit or Update Student Detailsd.
Delete () - Delete Student Detailsusing System.Web.Mvc;
using CRUDinMVC.Models;
namespace CRUDinMVC.Controllers
{
public class StudentController : Controller
{
// 1. *************RETRIEVE ALL STUDENT DETAILS ******************
// GET: Student
public ActionResult Index()
{
StudentDBHandle dbhandle = new StudentDBHandle();
ModelState.Clear();
return View(dbhandle.GetStudent());
}
// 2. *************ADD NEW STUDENT ******************
// GET: Student/Create
public ActionResult Create()
{
return View();
}
// POST: Student/Create
[HttpPost]
public ActionResult Create(StudentModel smodel)
{
try
{
if (ModelState.IsValid)
{
StudentDBHandle sdb = new StudentDBHandle();
if (sdb.AddStudent(smodel))
{
ViewBag.Message = "Student Details Added Successfully";
ModelState.Clear();
}
}
return View();
}
catch
{
return View();
}
}
// 3. ************* EDIT STUDENT DETAILS ******************
// GET: Student/Edit/5
public ActionResult Edit(int id)
{
StudentDBHandle sdb = new StudentDBHandle();
return View(sdb.GetStudent().Find(smodel => smodel.Id == id));
}
// POST: Student/Edit/5
[HttpPost]
public ActionResult Edit(int id, StudentModel smodel)
{
try
{
StudentDBHandle sdb = new StudentDBHandle();
sdb.UpdateDetails(smodel);
return RedirectToAction("Index");
}
catch
{
return View();
}
}
// 4. ************* DELETE STUDENT DETAILS ******************
// GET: Student/Delete/5
public ActionResult Delete(int id)
{
try
{
StudentDBHandle sdb = new StudentDBHandle();
if (sdb.DeleteStudent(id))
{
ViewBag.AlertMsg = "Student Deleted Successfully";
}
return RedirectToAction("Index");
}
catch
{
return View();
}
}
}
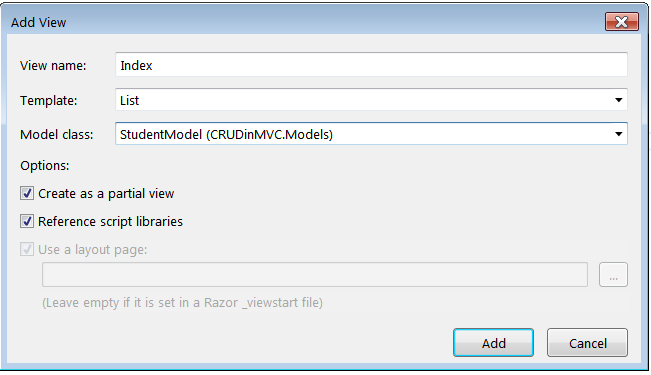
}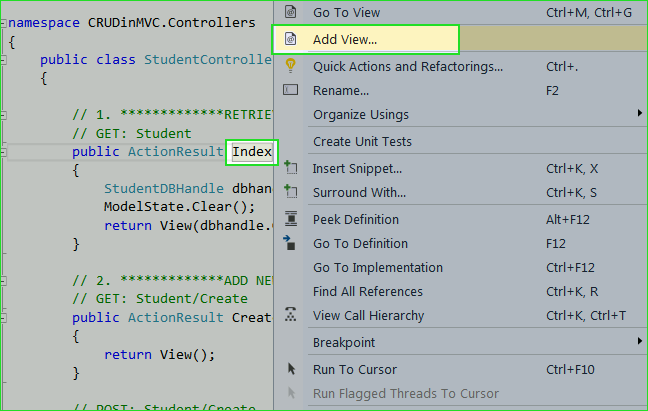 2. Fill following details in Add View Dialog box.
- a. View Name: Index
- b. Template: List
- c. Model Class: StudentModel (CRUDinMVC.Models)
- d. Check both CheckBoxes
- e. Click Add button to Add View.
 3. View: Index()
Make sure to change the following highlighted line as an example.
@model IEnumerable<CRUDinMVC.Models.StudentModel>
<p>
@Html.ActionLink("Create New", "Create")
</p>
<table class="table">
<tr>
<th>
@Html.DisplayNameFor(model => model.Name)
</th>
<th>
@Html.DisplayNameFor(model => model.City)
</th>
<th>
@Html.DisplayNameFor(model => model.Address)
</th>
<th></th>
</tr>
@foreach (var item in Model) {
<tr>
<td>
@Html.DisplayFor(modelItem => item.Name)
</td>
<td>
@Html.DisplayFor(modelItem => item.City)
</td>
<td>
@Html.DisplayFor(modelItem => item.Address)
</td>
<td>
@Html.ActionLink("Edit", "Edit", new { id=item.Id }) |
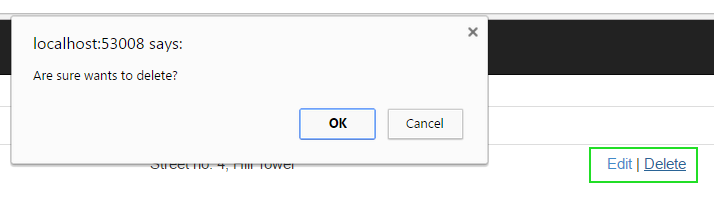
@Html.ActionLink("Delete", "Delete", new { id=item.Id }, new { onclick = "return confirm('Are sure wants to delete?');" })
</td>
</tr>
}
</table>4. Follow same procedure for
Create() and Edit() Method. Choose Create Template for Create() Method and Edit Template for Edit() Method.

View: Create()
@model CRUDinMVC.Models.StudentModel


@using (Html.BeginForm())
{
    @Html.AntiForgeryToken()

    <div class="form-horizontal">
        <h4>StudentModel</h4>
        <hr />
        @Html.ValidationSummary(true, "", new { @class = "text-danger" })
        <div class="form-group">
            @Html.LabelFor(model => model.Name, htmlAttributes: new { @class = "control-label col-md-2" })
            <div class="col-md-10">
                @Html.EditorFor(model => model.Name, new { htmlAttributes = new { @class = "form-control" } })
                @Html.ValidationMessageFor(model => model.Name, "", new { @class = "text-danger" })
            </div>
        </div>

        <div class="form-group">
            @Html.LabelFor(model => model.City, htmlAttributes: new { @class = "control-label col-md-2" })
            <div class="col-md-10">
                @Html.EditorFor(model => model.City, new { htmlAttributes = new { @class = "form-control" } })
                @Html.ValidationMessageFor(model => model.City, "", new { @class = "text-danger" })
            </div>
        </div>

        <div class="form-group">
            @Html.LabelFor(model => model.Address, htmlAttributes: new { @class = "control-label col-md-2" })
            <div class="col-md-10">
                @Html.EditorFor(model => model.Address, new { htmlAttributes = new { @class = "form-control" } })
                @Html.ValidationMessageFor(model => model.Address, "", new { @class = "text-danger" })
            </div>
        </div>

        <div class="form-group">
            <div class="col-md-offset-2 col-md-10">
                <input type="submit" value="Create" class="btn btn-default" />
            </div>
        </div>
        <h3>@ViewBag.Message</h3>
    </div>
}

<div>
    @Html.ActionLink("Back to List", "Index")
</div>

<script src="~/Scripts/jquery-1.10.2.min.js"></script>
<script src="~/Scripts/jquery.validate.min.js"></script>
<script src="~/Scripts/jquery.validate.unobtrusive.min.js"></script>
View: Edit()
@model CRUDinMVC.Models.StudentModel
@using (Html.BeginForm())
{
@Html.AntiForgeryToken()
<div class="form-horizontal">
<h4>StudentModel</h4>
<hr />
@Html.ValidationSummary(true, "", new { @class = "text-danger" })
@Html.HiddenFor(model => model.Id)
<div class="form-group">
@Html.LabelFor(model => model.Name, htmlAttributes: new { @class = "control-label col-md-2" })
<div class="col-md-10">
@Html.EditorFor(model => model.Name, new { htmlAttributes = new { @class = "form-control" } })
@Html.ValidationMessageFor(model => model.Name, "", new { @class = "text-danger" })
</div>
</div>
<div class="form-group">
@Html.LabelFor(model => model.City, htmlAttributes: new { @class = "control-label col-md-2" })
<div class="col-md-10">
@Html.EditorFor(model => model.City, new { htmlAttributes = new { @class = "form-control" } })
@Html.ValidationMessageFor(model => model.City, "", new { @class = "text-danger" })
</div>
</div>
<div class="form-group">
@Html.LabelFor(model => model.Address, htmlAttributes: new { @class = "control-label col-md-2" })
<div class="col-md-10">
@Html.EditorFor(model => model.Address, new { htmlAttributes = new { @class = "form-control" } })
@Html.ValidationMessageFor(model => model.Address, "", new { @class = "text-danger" })
</div>
</div>
<div class="form-group">
<div class="col-md-offset-2 col-md-10">
<input type="submit" value="Save" class="btn btn-default" />
</div>
</div>
</div>
}
<div>
@Html.ActionLink("Back to List", "Index")
</div>
<script src="~/Scripts/jquery-1.10.2.min.js"></script>
<script src="~/Scripts/jquery.validate.min.js"></script>
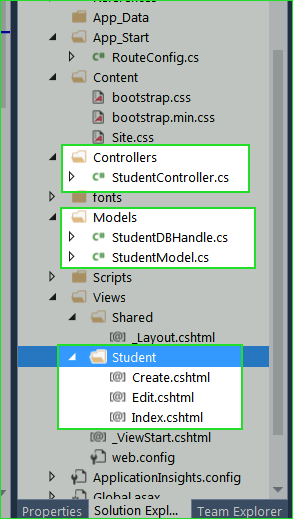
<script src="~/Scripts/jquery.validate.unobtrusive.min.js"></script>5. Your Solution Explorer should look like this.
1. Open
RouteConfig.cs from Solution Explorer.
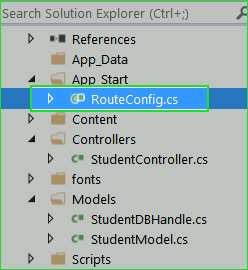
2. Change the highlighted code in your
RouteConfig.cs file.
using System.Web.Mvc;
using System.Web.Routing;

namespace CRUDinMVC
{
    public class RouteConfig
    {
        public static void RegisterRoutes(RouteCollection routes)
        {
            routes.IgnoreRoute("{resource}.axd/{*pathInfo}");

            routes.MapRoute(
                name: "Default",
                url: "{controller}/{action}/{id}",
                defaults: new { controller = "Student", action = "Index", id = UrlParameter.Optional }
            );
        }
    }
}
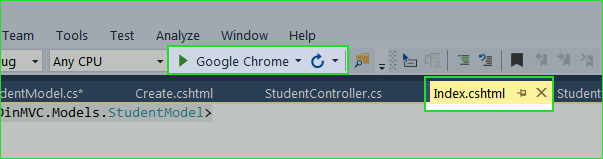
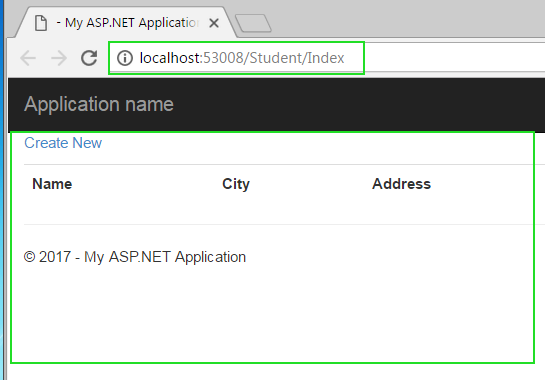
1. Open Index.cshtml View Page then press F5 to run your program. Selecting Index.cshtml will start your project with this page.
2. Index Page
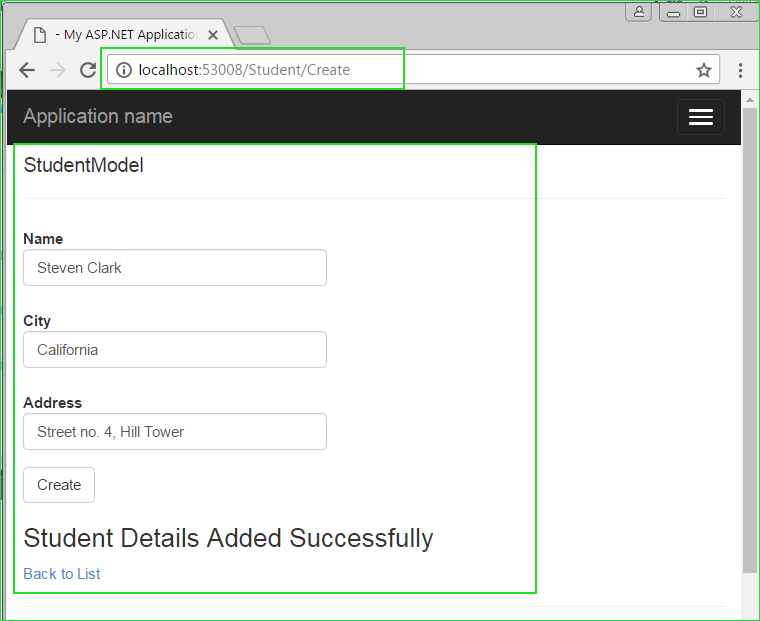
3. Create Page.
4. Edit Page

5. Delete Page
Summary:
In this tutorial, I have tried to explain full and complete create, update and delete program in MVC 5 without entity framework. I have inserted a great number of screenshots so that you can easily finish this project on your system. Believe me, once after completing this chapter your understanding of MVC, will be increased at a great level.