Race Conditions
Getting Started
Features and Benefits of EF Core
EF Core vs EF 6 (Key Differences)
Installing EF Core (NuGet Packages, Setup)
Configuring DbContext & DbSet
Introduction to EF Core
Getting started
🔍 Key Differences Between ASP.NET Core & ASP.NET Core MVC
.NET Framework vs .NET Core
Setting up .NET Core Environment
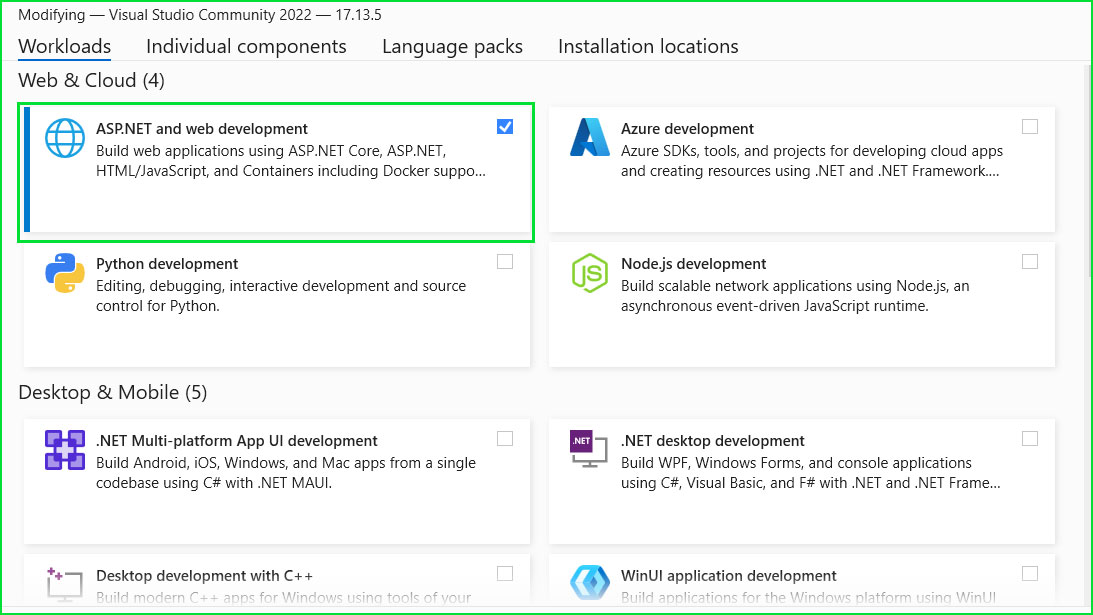
Option 1: Installing Visual Studio
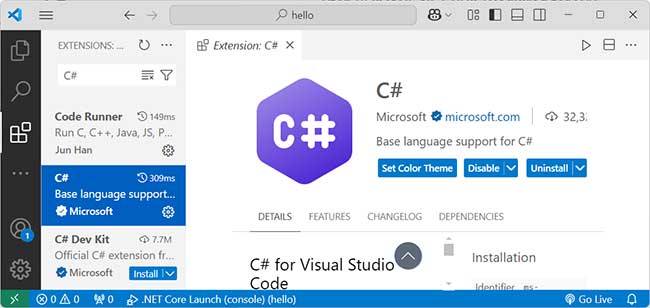
Option 2: Installing VS Code
Overview of Asp.net core
Option 1: Installing Visual Studio
C#
Increment and Decrement Operators
C# is and as Operator
C# is and as Operator – Easy Guide with Examples
Lambda Expression Operator
Index and Range Operators
Checked and Unchecked Operators
Null-Coalescing Operators
Null-Conditional Operators
C# Basic Statements
Mastering C# Statements: Your Ultimate Guide!
Ever felt stuck in a C# program, wondering why your code isn’t working as expected? Maybe you’ve been scratching your head over loops, struggling with exceptions, or just feeling lost with all those keywords. Don’t worry—I’ve got you!
This tutorial is your friendly guide to understanding
C# statements, and guess what? We’ll keep it simple, fun, and super interactive. 💡
Why Should You Care About C# Statements? 🤔
Think of statements as the
building blocks of your code. They tell your program what to do and when to do it. Without them, your code is just a bunch of words sitting there, doing nothing!
Mastering these statements will:
✅ Make you a confident coder—you’ll understand what’s happening inside your program.
✅ Help you fix errors faster—goodbye, frustration!
✅ Level up your skills—whether you’re a beginner or already coding, this will make you better.
What You’re Going to Learn 📚
We’re covering
everything you need to know about C# statements:
- 🔥 var & const – Understanding implicit typing and constants.
- 🚀 this – Referring to the current instance of a class.
- 🔥 Blocks & Empty Statements – Where your code lives and when to use an empty statement.
- 🚀 Goto & Labels – Jumping between code lines (but don’t overuse it!).
- 🔄 Break & Continue – Controlling loops like a pro.
- 🎯 Return & Throw – Exiting methods and handling errors the smart way.
- 📌 Checked & Unchecked – Controlling number overflows (super useful!).
- 🔐 Lock – Handling multi-threaded code without breaking things.
- 💡 Using – Automatically cleaning up resources (like magic).
- 📊 Enums & Structures – Organizing data neatly.
- 🛡 Variable Scope – Understanding local, block, class-level, and global scope in C#.
Let’s Make This Fun! 🎉
No boring theory dumps here! Instead, you’ll get
real examples, easy explanations, and coding exercises to sharpen your skills. And hey, if you ever get stuck, just take a deep breath, grab a coffee (or tea ☕), and come back. You’ve got this!
So, Are You Ready? 🚀
Hit that next lesson and let’s start writing some awesome C# code together. Trust me, by the end of this, you’ll be coding like a champ! 🏆
Let’s do this! 💪🔥
Checked
1. Checked Statement
Alright, let’s keep it simple! Imagine you’re carrying a glass full of water. If you keep pouring more water into it, at some point, it overflows and makes a mess. Now, what if you had a magical cup that warns you before it spills? That’s exactly what a checked statement does in C#!
When you’re working with numbers in programming, sometimes they get too big and overflow—like when a water glass can’t hold more liquid. If you don’t check for overflow, the number might turn into something completely unexpected (like negative when it should be positive). That’s a disaster, right?
This is where the checked statement comes to the rescue! It monitors your numbers and if an overflow happens, it stops the program and throws an error. That way, you know something went wrong instead of letting weird numbers ruin your calculations.
Why Use a Checked Statement?
Here are some real-world reasons why you should use it:
✅ Prevents unexpected results – Without checking, a number can flip to something completely wrong.
✅ Catches mistakes early – Instead of hunting down weird bugs later, your program stops immediately when an overflow happens.
✅ Great for important calculations – If you’re dealing with money, scores, or anything critical, you don’t want errors slipping through.
✅ Makes debugging easier – You’ll immediately know where the problem is, rather than scratching your head over mysterious numbers.
When Should You Use It?
👉 When working with large numbers – If your numbers grow big fast, better be safe than sorry.
👉 When precision matters – Financial apps, game scores, or scientific calculations should always be checked.
👉 When you want safer code – It helps you avoid sneaky bugs that can break your program later.
In short, a checked statement is like a safety net—it protects your program from number overflow disasters! 🚀
Alright, imagine you’re filling a water glass again. But this time, instead of stopping when it overflows, you just keep pouring—and whatever spills, spills. No warnings, no stopping, just let it happen. That’s exactly what an unchecked statement does in C#!
When numbers get too big in programming, they overflow. Without any checks, the program just keeps running, even if the number turns into something completely unexpected. Instead of throwing an error, it silently ignores the problem, which might lead to weird results later.
Why Use an Unchecked Statement?
There are a few reasons why you might let things slide instead of stopping the program:
✅ Faster execution – Without checking for overflow, your program runs slightly quicker.
✅ You know what you’re doing – If you’re handling values that are safe, checking might be unnecessary.
✅ You don’t care about overflow – Sometimes, you just want to let numbers wrap around and move on.
When Should You Use It?
👉 When performance matters – If you’re doing a lot of number crunching and need speed, unchecked might help.
👉 When overflow isn’t a big deal – If the result doesn’t break your logic, you can ignore it.
👉 When you’re working with non-critical data – For example, in small calculations where a wrong value won’t cause a disaster.
But be careful! An unchecked statement is like driving without seat belts—it might be fine most of the time, but when things go wrong, they go really wrong. So, use it wisely! 😃
Unchecked Example (Ignores Overflow)
C# Advanced Statements
👋 Welcome to the C# Advanced Statements Chapter!
Hey there, C# enthusiast! 🎉 If you’ve mastered the basics, it’s time to level up your skills with C# advanced statements. These powerful features help you write efficient, clean, and optimized code.
In this chapter, we’ll break down complex concepts into simple, easy-to-follow lessons. Each topic is packed with practical examples, real-world use cases, and clear explanations to help you understand when and why to use them.
📚 What You Are Going to Learn
Throughout this chapter, you’ll dive deep into the following C# advanced statements:
- ✔️ Constructor & Destructor – 🏗️ Learn how objects are initialized and cleaned up.
- 🔹 sizeof – 📏 Discover how to get the memory size of data types.
- 🔰 nameof – 🔖 Use this for safe and flexible code referencing.
- 📛 Alias – 🏷️ Create alternative names for types and namespaces.
- ⏩ Async & Await – 🚀 Master asynchronous programming for responsive applications.
- 🚫 Sealed – 🔒 Prevent class inheritance and ensure security.
- 🔄 Dynamic – 🌀 Work with dynamic types without compile-time type checking.
- 🌍 Global – 🌐 Understand how global accessibility works in C#.
- ⚠️ Required – ❗ Ensure mandatory properties in C# objects.
- 🔁 Iterators – 🔃 Implement custom iteration logic in collections.
- 📌 Yield Statement – 🎯 Simplify iterator methods and enhance performance.
By the end of this chapter, you’ll have a solid grasp of these advanced features and how to use them effectively in real-world applications. 🚀
Conclusion – Why This Chapter Matters
Mastering C# advanced statements will make you a better, more efficient C# developer. These concepts will enhance your coding abilities, improve performance, and give you more control over your programs.
So, whether you’re working on a high-performance application, optimizing code, or writing cleaner and more maintainable programs, these topics are must-know essentials!
Next What?
In the next lessons, we’ll dive into Constructors & Destructors and see how objects come to life and get cleaned up in C#. You’re going to love it!
👉 Stay tuned and get ready to code like a pro! 💡🔥
Sealed
Example: Sealed Class Restricting Inheritance
Global
File 2: Person.cs (No Need to Include ‘using System’)
File 3: Program.cs (No Need to Include ‘using System’)
Conditional statements
Hey there, future C# expert! 👋 Ever wondered how your code makes decisions? Whether it’s checking a user’s login, calculating discounts, or choosing a game mode—conditional statements are everywhere!
In this chapter, you’ll learn how to control the flow of your program using:
✅ If-Else Statements – Making decisions based on conditions.
✅ Switch Case – A cleaner way to handle multiple conditions.
By the end of this, you’ll be able to write smart, efficient, and readable C# programs! 😎
What Will You Learn? 📚
🟢 If-Else Statements (The Basics of Decision Making 🤔)
You’ll start with if-else statements, the building blocks of decision-making in C#. We’ll cover:
✔️ if statement – Runs code only if a condition is true.
✔️ if-else statement – Adds an alternative option when the condition is false.
✔️ else-if statement – Checks multiple conditions.
✔️ Nested if statements – One if inside another for complex decisions.
🔵 Switch Case (For Multiple Choices 🎯)
When you have many conditions to check, switch case makes your code cleaner and easier to read. You’ll learn:
✅ Traditional Switch Statement – The classic way to handle multiple conditions. 🏛️
✅ Switch Expression (C# 8.0+) – A shorter, cleaner way to write switch cases. 📝
✅ Pattern Matching in Switch (C# 9.0+) – A smarter way to handle different types of data. 🎯
✅ Switch with When Clause – Adding extra conditions inside a switch case. 🔍
🟢 Advanced Conditional Statements:
Conditional statements in C# can be enhanced using advanced features that improve efficiency and readability. These features help developers write more concise and optimized code.
✔ && (Logical AND) and || (Logical OR) – Combining conditions.
✔ ?? (Null-Coalescing) and ?. (Null-Conditional) – Handling null values safely.
✔ goto case and goto default – Jumping between switch cases.
✔ Short-Circuit Evaluation – Optimizing performance in condition checks.
🟣 Programming Examples
– Practical examples to apply your knowledge.
🟠 Exercises
Practice problems to test your skills.
Each lesson comes with easy-to-understand examples and real-world scenarios to help you grasp these concepts faster! 🚀
Why Should You Learn This? 🤷♂️
- Make your programs smarter – Let them decide what to do!
- Avoid unnecessary code repetition – Keep it clean and efficient.
- Handle user inputs like a pro – Build dynamic applications!
If-Else and Switch Case form the foundation of every C# program, so mastering them will make you a better developer! 😎
Conclusion 🎯
Woohoo! 🎉 You’re about to level up your C# skills by mastering conditional statements. Whether it’s if-else or switch case, you’ll soon be writing code that thinks and makes decisions like a pro!
👉 Ready? Let’s dive into If-Else Statements first! 🚀
Switch Expression (C# 8.0+)
Syntax of Switch Expression in C#
Pattern Matching in switch (C# 9.0+)
Advanced Conditional Statement
C# Loop
Welcome to the Ultimate Guide on Loops in C#!
Imagine you’re making a coffee for each of your friends, one by one. Would you rather repeat the same steps for everyone, or have a way to automatically brew coffee for all? That’s exactly what loops in C# do in programming—they save you from repeating code and make your life easier!
In this series, we’ll explore different types of loops, when to use them, and how to write clean, efficient code. With real-world examples, hands-on exercises, and a friendly vibe, you’ll breeze through these lessons—even if you’re just starting out! 🚀
What You Are Going to Learn
Here’s a sneak peek at the exciting lessons ahead:
🔄 Basic Loops:
- For Loop – Repeat tasks with a counter. Perfect for when you know how many times you need to loop.
- Foreach Loop – Ideal for cycling through arrays, lists, and collections. No messy counters—just smooth iterations!
- While Loop – Keep looping until a condition changes. Great for when you don’t know how many times to repeat.
- Do-While Loop – Similar to the while loop, but it always runs at least once.
⚡ Advanced Loops:
- Parallel.For – Speed things up by running loops simultaneously. Perfect for heavy tasks and large data sets.
- Parallel.ForEach – Like
foreach, but faster! Learn how to boost performance with parallel execution. - goto Loop – Explore this lesser-used loop for special cases. Use with caution—it can get tricky! 😅
🔁 Beyond Loops:
- Recursion – A function that calls itself? Mind-blowing! Discover how recursion can solve complex problems elegantly.
💻 Hands-On Practice:
- Programming Examples – See real-world scenarios with complete code and outputs.
- Programming Exercises – Test your skills with fun, challenging problems. Hints included to keep you motivated! 😉
Why Learn Loops in C#?
Loops are essential building blocks in programming. Without them, you’d be stuck writing repetitive code (and no one wants that!). By mastering loops, you’ll:
✅ Write cleaner, more efficient code
✅ Handle large amounts of data effortlessly
✅ Save time by automating repetitive tasks
✅ Build a strong foundation for more advanced C# concepts
Who Is This For?
Whether you’re a beginner exploring programming or someone brushing up on your skills, these lessons are crafted with you in mind. We keep things simple, interactive, and fun—because learning should never be boring! 😎
Ready to Start Your Loop Journey?
👉 Begin with the For Loop Lesson →
Let’s dive in and make looping in C# your new superpower! 💪
While loop
Syntax of While Loop in C#
Methods, Classes & Objects (Basic)
Methods
📌 Basic Syntax of a Method in C#
🎯 Example 1 – A Simple Method (No Parameters, No Return Type)
🎯 Example 2 – Method with Parameters (Takes Input)
🎯 Example 3 – Method with Return Type (Gives Output Back)
Parameter Arrays (params)
Optional & Named Parameters
Best Practices and Common Mistakes
Understanding Array
✅ 1. C# Array Example: Store Student Scores.
Multi dimensional array
🚀 Looping Through the 2D Array:
Example: Initializing and Accessing a 3D Array
Passing array as parameter
Returning Arrays from Methods
Sort, Search, Reverse, and Copy Arrays
Nested & Multiple Catch
📝 Syntax for Nested Catch:
Complete system exception
Checked and unchecked statements
Introduction to File Handling
Deleting and Moving Files
Path Class
📂 Example 1: Extracting File Name and Extension
Exception Handling in File Operations
Best Practices and Common Mistakes in File Handling
🖥️ Output (if file doesn’t exist):
🖥️ Output (inside log.txt file after multiple runs):
🖥️ Output (inside transactions.log):
File Streams and Buffering
Asynchronous File Operations
File Compression and Decompression
Example 1: Compress a File Using GZipStream
Code: Compress a File
Example 2: Decompress a GZip File
Code: Decompress a File
Working with Temporary Files
File Access Permissions and Security
FileSystemWatcher - Realtime File Monitoring
Large Files and Memory Optimization
OOPs - Classes, Methods & Objects
👋 Introduction:
Hey there, coding champ! 🌟 Ever wondered how large programs stay organized and easy to manage? Well, that’s where Classes in C# and Methods in C# come to the rescue! Think of classes as blueprints for creating objects, while methods are like instructions telling those objects what to do. Pretty cool, right? 😎
Imagine you’re designing a robot. The class is the robot’s blueprint, and the methods are the robot’s actions—like walk, talk, and dance! 💃🤖 This chapter will take you on a fun journey through classes, objects, and methods with easy words, real-world examples, and lots of hands-on coding. 🚀
📖 What You Are Going to Learn in This Chapter:
Here’s what’s lined up for you:
- 🏗️ Classes in C# – Understand how to create blueprints for your objects.
- 🏠 Constructor & Destructor – Learn how objects are built and cleaned up.
- 🧩 Static, Partial & Nested Class – Explore different types of classes and their uses.
- 🛡️ Access Modifiers in Classes – Control who can access what in your code.
- 🧬 Inheritance – Reuse code by inheriting features from other classes.
- 🧸 Objects in C# – Bring your classes to life by creating objects.
- 📝 Methods in C# – Discover how to define actions for your objects.
- 🌱 Best Practices for Writing Clean Classes and Methods – Write neat and maintainable code.
- 🚫 Common Mistakes to Avoid with Classes and Methods – Steer clear of common pitfalls.
Each lesson is designed to be simple, fun, and packed with examples that make sense. Plus, you’ll get practical tips along the way. You got this! 💪
🏁 Conclusion:
By the end of this chapter, you’ll have a solid grip on Classes in C# and Methods in C#. You’ll know how to build structured programs, reuse code efficiently, and write clean, understandable code. 💻✨ Just remember: practice is the key! Even if you stumble, keep going—every coder starts somewhere. 🚀
📅 Next What?
Woohoo! 🎉 You’re about to dive deep into each topic and get your hands dirty with code. In the next lesson, we’ll kick things off with Classes in C#—the backbone of object-oriented programming. Get ready to create your first class and see how it all works in action! 🙌
Static, Partial & Nested Class
Access Modifiers in Classes
Best Practices for Writing Clean Classes and Methods
OOPs - Constructors & Destructors
Destructor (~)
🖥️ Output (May vary due to Garbage Collection timing):
Abstraction in C#
💻 Example 1 – Abstract Class in C# 🚀
Example of Interface in C# 🚗
Abstract Class vs Interface – What’s the Difference? ⚖️
🌍 Real-World Example – Online Payment System
Best Practices and Guidelines
Best Practices & Common Mistakes
1️⃣ Use Interfaces for Defining Behavior, Not Implementation
✅ Good Practice
❌ Bad Practice (Interfaces should not have fields)
❌ Bad Practice (Too Many Responsibilities)
1️⃣ Not Implementing All Methods in an Interface
Inheritance in C#
🧐 How Inheritance is Used Here
1️⃣ Creating a Parent Class (Vehicle)
2️⃣ Creating a Child Class (Car)
base, virtual, override, and new keyword
5️⃣ Full Example Showing override vs new
Access Specifiers in Inheritance
Abstract and Virtual methods
3️⃣ Abstract Method vs. Virtual Method – Key Differences
Method Overriding vs Method Hiding
✅ Hiding Example – Advanced Calculator with new
Constructors vs Inheritance
Compile-time Polymorphism (Method Overloading)
Runtime Polymorphism (Method Overriding)
📝 Syntax of Method Overriding in C#
🚀 Use virtual in the parent class and override in the child class!
Polymorphism with Interfaces
Polymorphism with Abstract Classes
📝 Syntax of Abstract Classes in C#
💻 Example 1: Polymorphism with Abstract Classes in C#
Abstract Classes in C#
⚡ Example 1: Basic Abstract Class in C#
🏆 Example 2: Abstract Class with Concrete Methods
Abstract Classes vs Interfaces
Abstract Classes with Constructors
🎯 Simple Example of Abstract Class with Constructor
Delegates in C#
📝 Step-by-Step Explanation:
2️⃣ Create a Method That Matches the Delegate Signature:
3️⃣ Assign the Method to the Delegate:
📝 Step-by-Step Explanation:
2️⃣ Create the First Method:
3️⃣ Create the Second Method:
4️⃣ Assign the First Method to the Delegate:
5️⃣ Add the Second Method (Multi-Casting):
📝 Step-by-Step Explanation:
1️⃣ Creates an Action delegate:
2️⃣ Invokes the delegate:
Multicast Delegates
Syntax of Multicast Delegates in C#
Simple Example of Multicast Delegates in C#
Another Example: Logging System 📝
Built-in Delegates
Syntax of Built-in Delegates in C#
Generic Methods in C#
✨ Example 1: A Simple Generic Method
🏗 Example 2: Swapping Two Values Using Generics
Generics List<T>
📌 Example Code Using These Methods
Generics LinkedList<T>
Example: Creating a LinkedList of Strings
Generics Dictionary<TKey, TValue>
Example: Creating a Dictionary of Student Scores
🛠️ Code Breakdown: Line by Line
1️⃣ using System; & using System.Collections.Generic;
2️⃣ Creating a Dictionary
3️⃣ Adding Key-Value Pairs (Student Names & Scores)
4️⃣ Accessing a Value from Dictionary
What Happens If the Key Doesn’t Exist?
📌 Important Methods of Generics Dictionary<TKey, TValue> in C#
💡 Example 1: Working with Dictionary Methods
Generic Queue<T>
Syntax of Generics Queue<T> in C#
2️⃣ Adding People to the Queue (Enqueue)
4️⃣ Removing the First Person (Dequeue)
5️⃣ Checking the Next Person in Line (Peek)
📌 Important Methods of Queue<T>
Generic Stack<T>
🎯 Example 1: Creating and Using a Stack<T> in C#
🔥 Important Methods of Stack<T> in C#
💡 Example 2: Checking if an Item Exists in Stack
💡 Example 3: Reversing a String Using Stack<T> in C#
Generics HashSet<T>
🚀 Example 1: Basic HashSet<T> in C#
Introduction to Threads
👎 Without Threads (Single-threaded)
👍 With Threads (Multi-threaded)
Thread Lifecycle and Management
✅ Example: Checking Thread States
🔥 Foreground vs. Background Threads in C#
🟢 Example 1: Foreground Thread (Keeps Running Until Completion)
🔵 Example 2: Background Thread (Stops When Main Thread Ends)
🎯 Key Differences Between Foreground and Background Threads
✅ Example: Manually Pausing and Resuming a Thread
✅ Checking if a Thread is Alive (IsAlive property)
✅ Example: Auto-Save with Background Thread
Thread Synchronization and Safety
Lock & Monitor
🤔 When to Use lock vs. Monitor?
Mutex, Semaphore & SemaphoreSlim
🤔 Mutex vs Semaphore vs SemaphoreSlim
AutoResetEvent and ManualResetEvent
🤔 AutoResetEvent vs ManualResetEvent – What’s the Difference?
Deadlocks and common pitfalls
Thread Pooling
🔄 Thread Pooling vs Manual Thread Creation
Multithreading
🚀 Example 1: Creating a Simple Thread in C#
✅ Basic Code Example
🎯 Example 2: Running Multiple Threads
✅ Code Example
Understanding TPL
🚀 Example 1: Creating a Simple Task
✅ Code Example
🎯 Example 2: Running Multiple Tasks in Parallel
✅ Code Example
Start
Getting Started
Data Validation using Data Annotations
SaveChanges vs SaveChangesAsync
Tracking vs No-Tracking Queries
Using In-Memory Database
EF Core in MVC Controllers
EF Core vs Dapper
Getting Started
Why Learn ADO.NET in the EF/Dapper Era?
Installing Required Tools (SQL Server, Visual Studio)
ADO.NET Architecture Overview (Connected vs Disconnected)
Lock & Monitor
🤔 When to Use lock vs. Monitor?
Introduction to ADO.NET
Establishing Database Connections (SqlConnection)
Introduction to DataSet and DataTable
Passing Data Using ViewData
Executing Scalar Queries
Connection Pooling
Handling Exceptions (try-catch with SqlException)
Differences Between Connected vs Disconnected Models
Option 2: Installing VS Code
Reading and Writing XML with DataSet
Using ADO.NET in ASP.NET MVC
.NET Framework vs .NET Core
Comparing ADO.NET vs Entity Framework vs Dapper
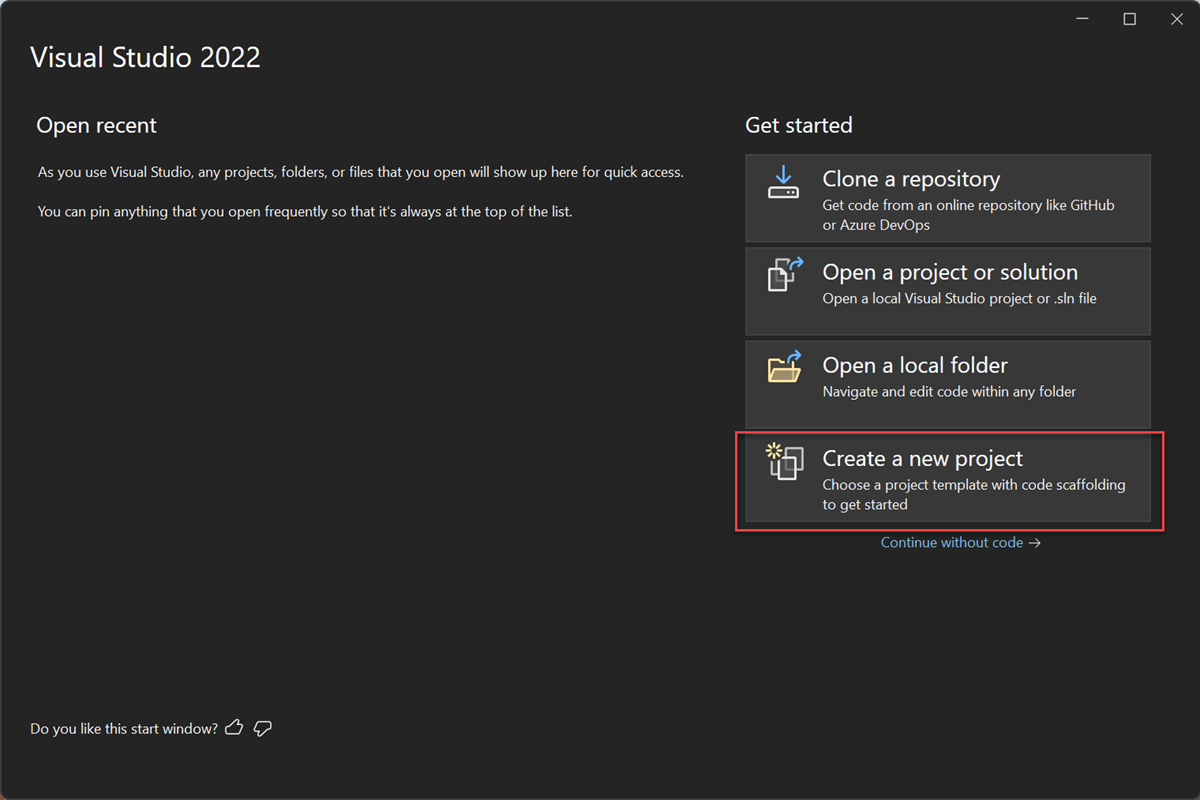
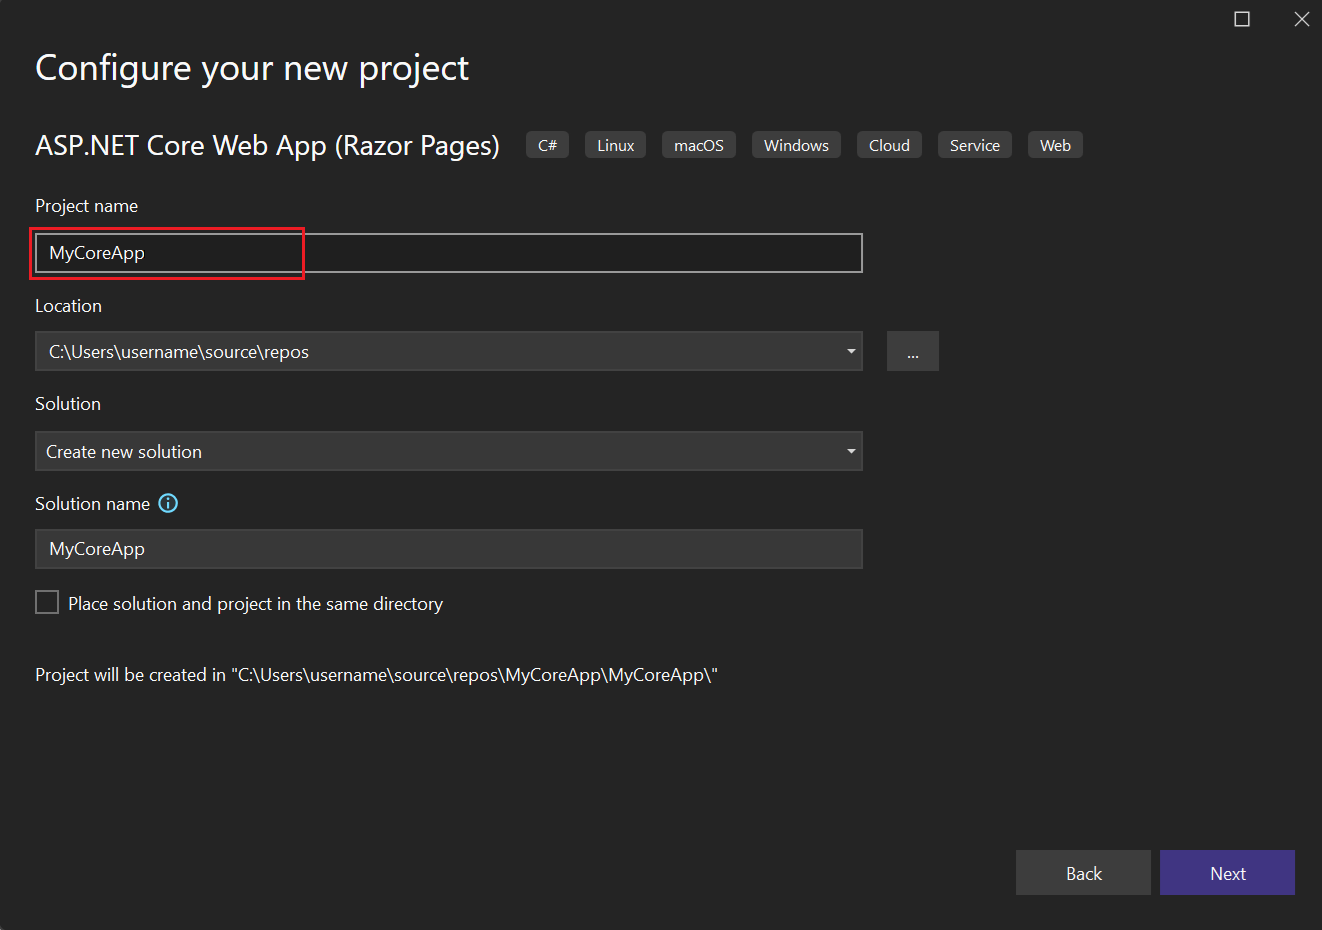
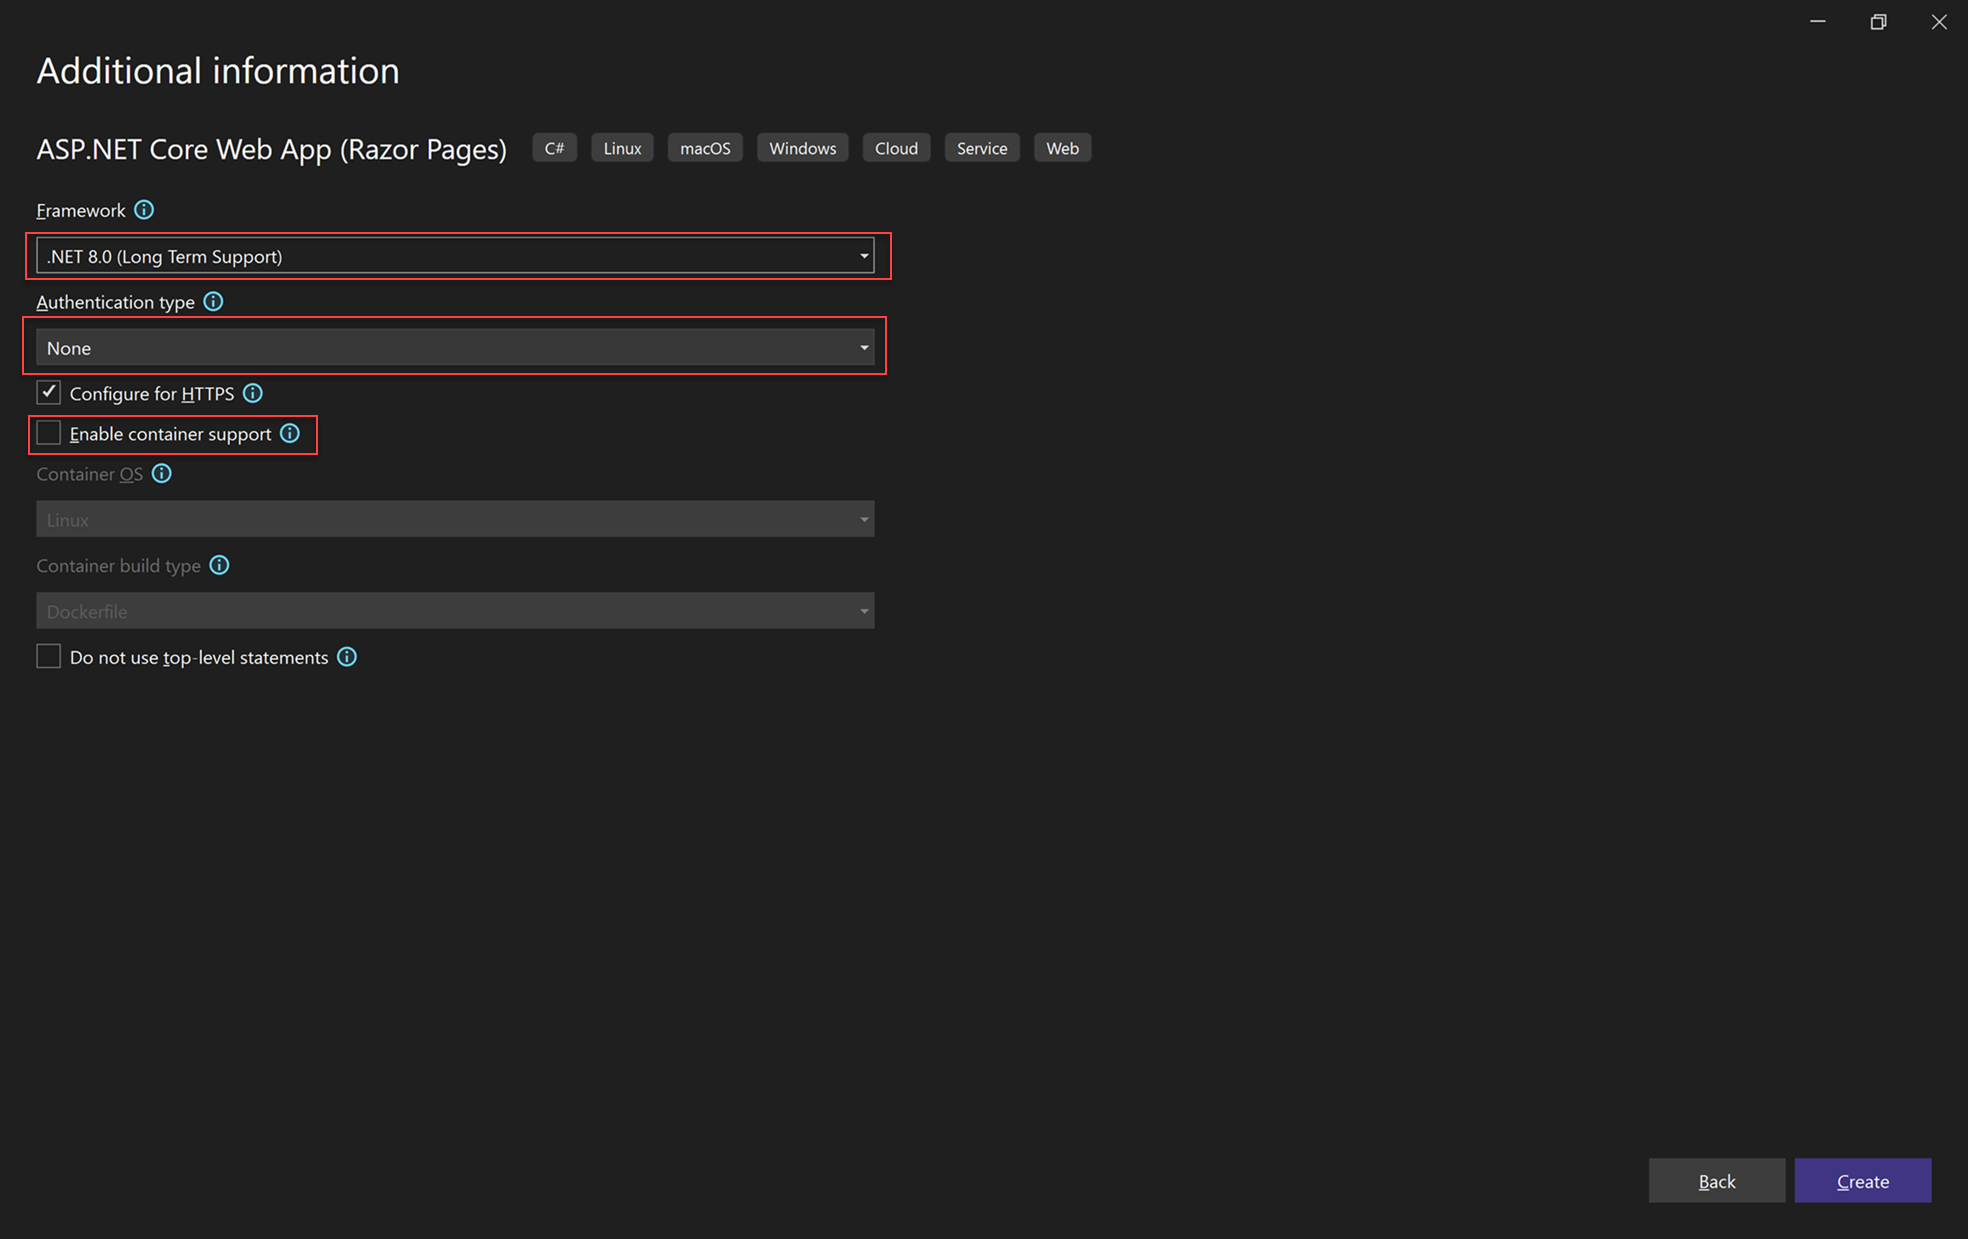
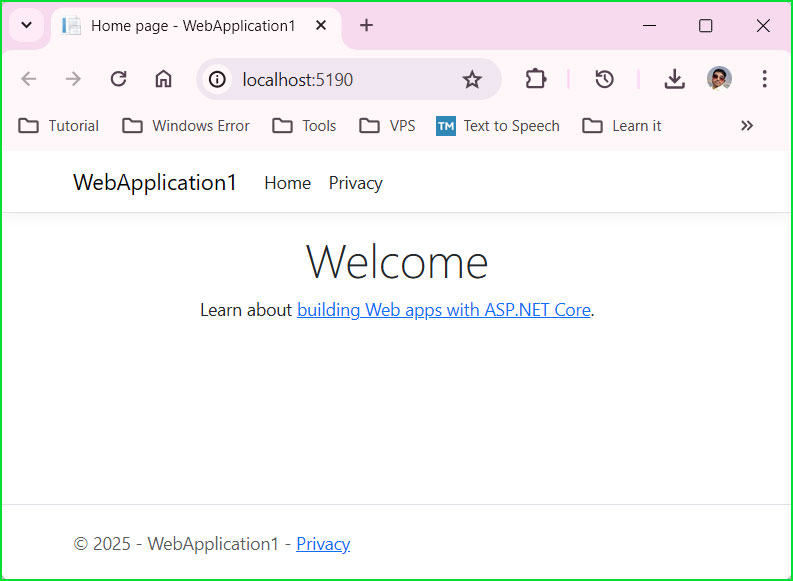
Create First .NET Core Project
Create .NET Core App using Visual Studio
Create .NET Core Project using VS Code
Features and Benefits of EF Core
.NetCore
Getting started
🔍 Key Differences Between ASP.NET Core & ASP.NET Core MVC
.NET Framework vs .NET Core
Setting up .NET Core Environment
Option 1: Installing Visual Studio
Option 2: Installing VS Code
Create First .NET Core Project
Create .NET Core App using Visual Studio
Create .NET Core Project using VS Code
Understanding ASP.NET Core Fundamentals
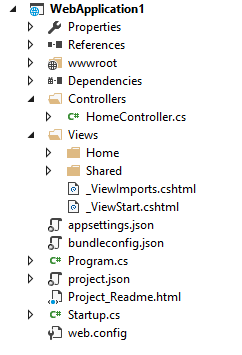
Understanding Project Folders and Files
Program.cs and Startup.cs Explained
Understanding Dependency Injection (DI)
Understanding Configuration Files (appsettings.json)
Understand MVC in .Net Core
Basic understandings of MVC
Controllers – The Brain of Your App
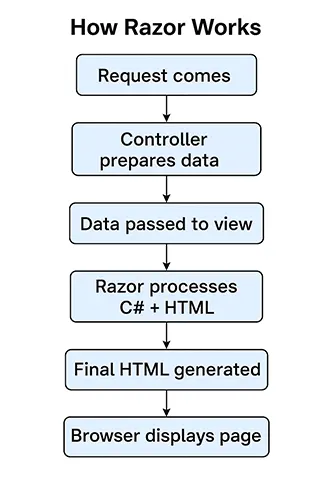
Views – Displaying Data with Razor
⭐ A Bit More Razor Magic
✔️ Loop Example:
Models – Handling Data and Logic
Controllers in ASP.NET Core
Introduction to Controllers
Handling HTTP Requests (GET, POST, PUT, DELETE)
Returning Results (ViewResult, JsonResult, RedirectResult)
Controller Parameters & Model Binding
💻 Code Example (with Clear Output)
Example Controller
📤 Expected Outputs
🔵 Output of /User/GetUser?name=Rahul&age=25
Error Handling in Controllers
Partial Views (Reusable UI Blocks)
Create a file named _UserCard.cshtml inside:
Passing Data Using ViewData
Passing Data Using ViewBag
Passing Data Using TempData
Passing Data Using Strongly Typed Models
View Components (Mini Controllers for UI)
Creating Simple Models (POCO classes)
Strongly Typed Models with Views
Validation in Models (Data Annotations)
Model Binding in Detail (Form Data, Query String, Route Data)
Using Models with EF Core (Database Integration)
Razor Pages & Syntax (Quick Lesson)
Introduction to Razor Pages
Writing Razor Syntax (Inline C#, Loops, Conditions)
Creating a Simple Razor Page Example
Model Binding & Validation in APIs
Testing with Swagger & Postman
Error Handling & Exception Filters
Introduction to Entity Framework Core
Code-First Approach (Models & Migrations)
Database-First Approach (Scaffold Existing DB)
CRUD Operations in EF Core
Relationships (1-1, 1-M, M-M)
Async Programming in EF Core
Authentication vs Authorization
ASP.NET Core Identity Basics
Policy-Based Authorization
JWT Authentication (for APIs)
External Logins (Google, Facebook, etc.)
Dependency Injection Advanced (Scoped, Singleton, Transient)
Background Services & Hosted Services
Globalization & Localization
SignalR for Real-Time Apps
Caching (In-Memory, Distributed, Response Caching)
Unit Testing in ASP.NET Core
Integration Testing in ASP.NET Core
Debugging Tips for Developers
Publishing ASP.NET Core App
Hosting on IIS, Linux, Docker
CI/CD with GitHub Actions or Azure DevOps
Configurations for Production
Performance Optimization in ASP.NET Core
Minimal APIs in ASP.NET Core
Blazor (Server & WASM) Basics
Microservices with ASP.NET Core
Health Checks in ASP.NET Core
Rate Limiting & Throttling
Approaches in EF Core
Code-First Approach (with Example)
Database-First Approach (Scaffolding)
Model-First Approach (Conceptual)
Basic Guideline
Variables and DataTypes
Creating and Applying Migrations
Basics of LINQ in EF Core
Shadow Properties
Fluent Validation Rules
Transactions in EF Core
Compiled Queries
Mocking DbContext for Unit Tests
EF Core with Razor Pages
EF Core vs ADO.NET
Mutex, Semaphore & SemaphoreSlim
🤔 Mutex vs Semaphore vs SemaphoreSlim
Why Learn ADO.NET in the EF/Dapper Era?
ADO.NET Basics
Establishing Database Connections (SqlConnection)
Executing Commands (SqlCommand)
Using Parameters to Prevent SQL Injection
SqlDataReader for Fast Forward-Only Data Access
Executing Commands (SqlCommand)
Using DataAdapter to Fill DataSets
Passing Data Using ViewBag
Executing Non-Query Commands (INSERT, UPDATE, DELETE)
Batch Queries
Managing Connection Lifetime
Basic Operators
Increment and Decrement Operators
Working with Offline Data
Setting up .NET Core Environment
Option 1: Installing Visual Studio
Option 2: Installing VS Code
Persisting Data as XML
Displaying Data in Razor Views
When to Choose ADO.NET Over ORMs
EF Core vs EF 6 (Key Differences)
Working with Models
Data Annotations in Models
Complex Types and Value Objects
Understanding ASP.NET Core Fundamentals
Understanding Project Folders and Files
Program.cs and Startup.cs Explained
Understanding Dependency Injection (DI)
Understanding Configuration Files (appsettings.json)
Where to write c#
Updating the Database
Filtering, Sorting, and Grouping
Owned Entity Types
Concurrency Handling (RowVersion, Timestamp)
Unit of Work Pattern
Batch Operations
Integration Testing with EF Core
EF Core in Web APIs (Returning JSON)
Choosing the Right Data Access Strategy
AutoResetEvent and ManualResetEvent
🤔 AutoResetEvent vs ManualResetEvent – What’s the Difference?
Installing Required Tools (SQL Server, Visual Studio)
Using Parameters to Prevent SQL Injection
Working with DataSets & DataTables
Introduction to DataSet and DataTable
Using DataAdapter to Fill DataSets
Performing CRUD Operations with DataSets
Data Relations and Constraints
Data Binding with DataGridView
Performing CRUD Operations with DataSets
Passing Data Using TempData
Executing Stored Procedures
Using SqlBulkCopy for High-Performance Inserts
Using using Statement for Resource Cleanup
Updating Database from DataSet Changes
C# Advanced Operators
C# is and as Operator
C# is and as Operator – Easy Guide with Examples
Lambda Expression Operator
Index and Range Operators
Checked and Unchecked Operators
Null-Coalescing Operators
Null-Conditional Operators
Working with DiffGram for Data Updates
ADO.NET in Web API (Returning JSON)
Modern Use Cases of ADO.NET in Enterprise Apps
Create .NET Core App using Visual Studio
Installing EF Core (NuGet Packages, Setup)
Understand MVC in .Net Core
Basic understandings of MVC
Controllers – The Brain of Your App
Views – Displaying Data with Razor
⭐ A Bit More Razor Magic
✔️ Loop Example:
Models – Handling Data and Logic
CRUD Operations
Insert Data (Add, AddRange)
Read Data (LINQ Queries, Filtering, Paging)
Change Tracking Explained
Coding exercise
Rolling Back Migrations
Aggregates (Sum, Count, Average, etc.)
Value Conversions
Optimistic vs Pessimistic Concurrency
Caching in EF Core
Dependency Injection of DbContext
Reader-writer locks
ADO.NET Architecture Overview (Connected vs Disconnected)
EntityFramework
Features and Benefits of EF Core
EF Core vs EF 6 (Key Differences)
Installing EF Core (NuGet Packages, Setup)
Configuring DbContext & DbSet
Code-First Approach (with Example)
Database-First Approach (Scaffolding)
Model-First Approach (Conceptual)
Data Annotations in Models
Complex Types and Value Objects
Insert Data (Add, AddRange)
Read Data (LINQ Queries, Filtering, Paging)
Change Tracking Explained
Many-to-Many Relationship
Loading Related Data (Eager, Lazy, Explicit)
Migrations & Database Management
Creating and Applying Migrations
Managing Multiple Environments
Basics of LINQ in EF Core
Filtering, Sorting, and Grouping
Aggregates (Sum, Count, Average, etc.)
Raw SQL Queries in EF Core
Data Validation using Data Annotations
Concurrency Handling (RowVersion, Timestamp)
Optimistic vs Pessimistic Concurrency
Transactions & Unit of Work
SaveChanges vs SaveChangesAsync
Tracking vs No-Tracking Queries
Best Practices for Performance
Mocking DbContext for Unit Tests
Integration Testing with EF Core
EF Core with ASP.NET Core
EF Core in MVC Controllers
EF Core in Web APIs (Returning JSON)
Dependency Injection of DbContext
Alternatives & When Not to Use EF Core
Choosing the Right Data Access Strategy
SqlDataReader for Fast Forward-Only Data Access
Data Relations and Constraints
Commands and Transactions
Executing Non-Query Commands (INSERT, UPDATE, DELETE)
Executing Stored Procedures
Transactions in ADO.NET (Commit & Rollback)
Passing Data Using Strongly Typed Models
Transactions in ADO.NET (Commit & Rollback)
Asynchronous Database Operations
Performance Tips and Best Practices
Merge and AcceptChanges in DataSets
C# Basic Statements
Mastering C# Statements: Your Ultimate Guide!
Ever felt stuck in a C# program, wondering why your code isn’t working as expected? Maybe you’ve been scratching your head over loops, struggling with exceptions, or just feeling lost with all those keywords. Don’t worry—I’ve got you!
This tutorial is your friendly guide to understanding
C# statements, and guess what? We’ll keep it simple, fun, and super interactive. 💡
Why Should You Care About C# Statements? 🤔
Think of statements as the
building blocks of your code. They tell your program what to do and when to do it. Without them, your code is just a bunch of words sitting there, doing nothing!
Mastering these statements will:
✅ Make you a confident coder—you’ll understand what’s happening inside your program.
✅ Help you fix errors faster—goodbye, frustration!
✅ Level up your skills—whether you’re a beginner or already coding, this will make you better.
What You’re Going to Learn 📚
We’re covering
everything you need to know about C# statements:
- 🔥 var & const – Understanding implicit typing and constants.
- 🚀 this – Referring to the current instance of a class.
- 🔥 Blocks & Empty Statements – Where your code lives and when to use an empty statement.
- 🚀 Goto & Labels – Jumping between code lines (but don’t overuse it!).
- 🔄 Break & Continue – Controlling loops like a pro.
- 🎯 Return & Throw – Exiting methods and handling errors the smart way.
- 📌 Checked & Unchecked – Controlling number overflows (super useful!).
- 🔐 Lock – Handling multi-threaded code without breaking things.
- 💡 Using – Automatically cleaning up resources (like magic).
- 📊 Enums & Structures – Organizing data neatly.
- 🛡 Variable Scope – Understanding local, block, class-level, and global scope in C#.
Let’s Make This Fun! 🎉
No boring theory dumps here! Instead, you’ll get
real examples, easy explanations, and coding exercises to sharpen your skills. And hey, if you ever get stuck, just take a deep breath, grab a coffee (or tea ☕), and come back. You’ve got this!
So, Are You Ready? 🚀
Hit that next lesson and let’s start writing some awesome C# code together. Trust me, by the end of this, you’ll be coding like a champ! 🏆
Let’s do this! 💪🔥
Checked
1. Checked Statement
Alright, let’s keep it simple! Imagine you’re carrying a glass full of water. If you keep pouring more water into it, at some point, it overflows and makes a mess. Now, what if you had a magical cup that warns you before it spills? That’s exactly what a checked statement does in C#!
When you’re working with numbers in programming, sometimes they get too big and overflow—like when a water glass can’t hold more liquid. If you don’t check for overflow, the number might turn into something completely unexpected (like negative when it should be positive). That’s a disaster, right?
This is where the checked statement comes to the rescue! It monitors your numbers and if an overflow happens, it stops the program and throws an error. That way, you know something went wrong instead of letting weird numbers ruin your calculations.
Why Use a Checked Statement?
Here are some real-world reasons why you should use it:
✅ Prevents unexpected results – Without checking, a number can flip to something completely wrong.
✅ Catches mistakes early – Instead of hunting down weird bugs later, your program stops immediately when an overflow happens.
✅ Great for important calculations – If you’re dealing with money, scores, or anything critical, you don’t want errors slipping through.
✅ Makes debugging easier – You’ll immediately know where the problem is, rather than scratching your head over mysterious numbers.
When Should You Use It?
👉 When working with large numbers – If your numbers grow big fast, better be safe than sorry.
👉 When precision matters – Financial apps, game scores, or scientific calculations should always be checked.
👉 When you want safer code – It helps you avoid sneaky bugs that can break your program later.
In short, a checked statement is like a safety net—it protects your program from number overflow disasters! 🚀
Alright, imagine you’re filling a water glass again. But this time, instead of stopping when it overflows, you just keep pouring—and whatever spills, spills. No warnings, no stopping, just let it happen. That’s exactly what an unchecked statement does in C#!
When numbers get too big in programming, they overflow. Without any checks, the program just keeps running, even if the number turns into something completely unexpected. Instead of throwing an error, it silently ignores the problem, which might lead to weird results later.
Why Use an Unchecked Statement?
There are a few reasons why you might let things slide instead of stopping the program:
✅ Faster execution – Without checking for overflow, your program runs slightly quicker.
✅ You know what you’re doing – If you’re handling values that are safe, checking might be unnecessary.
✅ You don’t care about overflow – Sometimes, you just want to let numbers wrap around and move on.
When Should You Use It?
👉 When performance matters – If you’re doing a lot of number crunching and need speed, unchecked might help.
👉 When overflow isn’t a big deal – If the result doesn’t break your logic, you can ignore it.
👉 When you’re working with non-critical data – For example, in small calculations where a wrong value won’t cause a disaster.
But be careful! An unchecked statement is like driving without seat belts—it might be fine most of the time, but when things go wrong, they go really wrong. So, use it wisely! 😃
Unchecked Example (Ignores Overflow)
Simple CRUD Application with ADO.NET
Create .NET Core Project using VS Code
Configuring DbContext & DbSet
Relationships in EF Core
Many-to-Many Relationship
Loading Related Data (Eager, Lazy, Explicit)
Understanding Data Types
Seeding Initial Data
Projection with Select
Controllers in ASP.NET Core
Introduction to Controllers
Handling HTTP Requests (GET, POST, PUT, DELETE)
Returning Results (ViewResult, JsonResult, RedirectResult)
Controller Parameters & Model Binding
💻 Code Example (with Clear Output)
Example Controller
📤 Expected Outputs
🔵 Output of /User/GetUser?name=Rahul&age=25
Error Handling in Controllers
Global Query Filters
Interceptors & Logging
Views in ASP.NET Core
Partial Views (Reusable UI Blocks)
Create a file named _UserCard.cshtml inside:
Passing Data Using ViewData
Passing Data Using ViewBag
Passing Data Using TempData
Passing Data Using Strongly Typed Models
View Components (Mini Controllers for UI)
C# Advanced Statements
👋 Welcome to the C# Advanced Statements Chapter!
Hey there, C# enthusiast! 🎉 If you’ve mastered the basics, it’s time to level up your skills with C# advanced statements. These powerful features help you write efficient, clean, and optimized code.
In this chapter, we’ll break down complex concepts into simple, easy-to-follow lessons. Each topic is packed with practical examples, real-world use cases, and clear explanations to help you understand when and why to use them.
📚 What You Are Going to Learn
Throughout this chapter, you’ll dive deep into the following C# advanced statements:
- ✔️ Constructor & Destructor – 🏗️ Learn how objects are initialized and cleaned up.
- 🔹 sizeof – 📏 Discover how to get the memory size of data types.
- 🔰 nameof – 🔖 Use this for safe and flexible code referencing.
- 📛 Alias – 🏷️ Create alternative names for types and namespaces.
- ⏩ Async & Await – 🚀 Master asynchronous programming for responsive applications.
- 🚫 Sealed – 🔒 Prevent class inheritance and ensure security.
- 🔄 Dynamic – 🌀 Work with dynamic types without compile-time type checking.
- 🌍 Global – 🌐 Understand how global accessibility works in C#.
- ⚠️ Required – ❗ Ensure mandatory properties in C# objects.
- 🔁 Iterators – 🔃 Implement custom iteration logic in collections.
- 📌 Yield Statement – 🎯 Simplify iterator methods and enhance performance.
By the end of this chapter, you’ll have a solid grasp of these advanced features and how to use them effectively in real-world applications. 🚀
Conclusion – Why This Chapter Matters
Mastering C# advanced statements will make you a better, more efficient C# developer. These concepts will enhance your coding abilities, improve performance, and give you more control over your programs.
So, whether you’re working on a high-performance application, optimizing code, or writing cleaner and more maintainable programs, these topics are must-know essentials!
Next What?
In the next lessons, we’ll dive into Constructors & Destructors and see how objects come to life and get cleaned up in C#. You’re going to love it!
👉 Stay tuned and get ready to code like a pro! 💡🔥
Sealed
Example: Sealed Class Restricting Inheritance
Global
File 2: Person.cs (No Need to Include ‘using System’)
File 3: Program.cs (No Need to Include ‘using System’)
Best Practices for Performance
Thread-safe collections
Data Binding with DataGridView
Advanced ADO.NET Concepts
Using SqlBulkCopy for High-Performance Inserts
Asynchronous Database Operations
Handling Multiple Result Sets
Handling Multiple Result Sets
ADO.NET
Why Learn ADO.NET in the EF/Dapper Era?
Installing Required Tools (SQL Server, Visual Studio)
ADO.NET Architecture Overview (Connected vs Disconnected)
Establishing Database Connections (SqlConnection)
Executing Commands (SqlCommand)
Using Parameters to Prevent SQL Injection
SqlDataReader for Fast Forward-Only Data Access
Working with DataSets & DataTables
Introduction to DataSet and DataTable
Using DataAdapter to Fill DataSets
Performing CRUD Operations with DataSets
Data Relations and Constraints
Data Binding with DataGridView
Commands and Transactions
Executing Non-Query Commands (INSERT, UPDATE, DELETE)
Executing Stored Procedures
Transactions in ADO.NET (Commit & Rollback)
Advanced ADO.NET Concepts
Using SqlBulkCopy for High-Performance Inserts
Asynchronous Database Operations
Handling Multiple Result Sets
Error Handling & Best Practices
Handling Exceptions (try-catch with SqlException)
Managing Connection Lifetime
Using using Statement for Resource Cleanup
Performance Tips and Best Practices
Disconnected Architecture in Detail
Differences Between Connected vs Disconnected Models
Working with Offline Data
Updating Database from DataSet Changes
Merge and AcceptChanges in DataSets
Reading and Writing XML with DataSet
Working with DiffGram for Data Updates
Using ADO.NET in ASP.NET MVC
Displaying Data in Razor Views
ADO.NET in Web API (Returning JSON)
Simple CRUD Application with ADO.NET
Comparing ADO.NET vs Entity Framework vs Dapper
When to Choose ADO.NET Over ORMs
Modern Use Cases of ADO.NET in Enterprise Apps
Understanding Project Folders and Files
Code-First Approach (with Example)
Value Type
Migrations & Database Management
Creating and Applying Migrations
Managing Multiple Environments
Managing Multiple Environments
Raw SQL Queries in EF Core
Models in ASP.NET Core
Creating Simple Models (POCO classes)
Strongly Typed Models with Views
Validation in Models (Data Annotations)
Model Binding in Detail (Form Data, Query String, Route Data)
Using Models with EF Core (Database Integration)
Error Handling & Best Practices
Handling Exceptions (try-catch with SqlException)
Managing Connection Lifetime
Using using Statement for Resource Cleanup
Performance Tips and Best Practices
Conditional statements
Hey there, future C# expert! 👋 Ever wondered how your code makes decisions? Whether it’s checking a user’s login, calculating discounts, or choosing a game mode—conditional statements are everywhere!
In this chapter, you’ll learn how to control the flow of your program using:
✅ If-Else Statements – Making decisions based on conditions.
✅ Switch Case – A cleaner way to handle multiple conditions.
By the end of this, you’ll be able to write smart, efficient, and readable C# programs! 😎
What Will You Learn? 📚
🟢 If-Else Statements (The Basics of Decision Making 🤔)
You’ll start with if-else statements, the building blocks of decision-making in C#. We’ll cover:
✔️ if statement – Runs code only if a condition is true.
✔️ if-else statement – Adds an alternative option when the condition is false.
✔️ else-if statement – Checks multiple conditions.
✔️ Nested if statements – One if inside another for complex decisions.
🔵 Switch Case (For Multiple Choices 🎯)
When you have many conditions to check, switch case makes your code cleaner and easier to read. You’ll learn:
✅ Traditional Switch Statement – The classic way to handle multiple conditions. 🏛️
✅ Switch Expression (C# 8.0+) – A shorter, cleaner way to write switch cases. 📝
✅ Pattern Matching in Switch (C# 9.0+) – A smarter way to handle different types of data. 🎯
✅ Switch with When Clause – Adding extra conditions inside a switch case. 🔍
🟢 Advanced Conditional Statements:
Conditional statements in C# can be enhanced using advanced features that improve efficiency and readability. These features help developers write more concise and optimized code.
✔ && (Logical AND) and || (Logical OR) – Combining conditions.
✔ ?? (Null-Coalescing) and ?. (Null-Conditional) – Handling null values safely.
✔ goto case and goto default – Jumping between switch cases.
✔ Short-Circuit Evaluation – Optimizing performance in condition checks.
🟣 Programming Examples
– Practical examples to apply your knowledge.
🟠 Exercises
Practice problems to test your skills.
Each lesson comes with easy-to-understand examples and real-world scenarios to help you grasp these concepts faster! 🚀
Why Should You Learn This? 🤷♂️
- Make your programs smarter – Let them decide what to do!
- Avoid unnecessary code repetition – Keep it clean and efficient.
- Handle user inputs like a pro – Build dynamic applications!
If-Else and Switch Case form the foundation of every C# program, so mastering them will make you a better developer! 😎
Conclusion 🎯
Woohoo! 🎉 You’re about to level up your C# skills by mastering conditional statements. Whether it’s if-else or switch case, you’ll soon be writing code that thinks and makes decisions like a pro!
👉 Ready? Let’s dive into If-Else Statements first! 🚀
Switch Expression (C# 8.0+)
Syntax of Switch Expression in C#
Pattern Matching in switch (C# 9.0+)
Advanced Conditional Statement
Database-First Approach (Scaffolding)
Program.cs and Startup.cs Explained
Reference Type
Razor Pages & Syntax (Quick Lesson)
Introduction to Razor Pages
Writing Razor Syntax (Inline C#, Loops, Conditions)
Creating a Simple Razor Page Example
Deadlocks and common pitfalls
Disconnected Architecture in Detail
Differences Between Connected vs Disconnected Models
Working with Offline Data
Updating Database from DataSet Changes
Merge and AcceptChanges in DataSets
Model-First Approach (Conceptual)
C# Loop
Welcome to the Ultimate Guide on Loops in C#!
Imagine you’re making a coffee for each of your friends, one by one. Would you rather repeat the same steps for everyone, or have a way to automatically brew coffee for all? That’s exactly what loops in C# do in programming—they save you from repeating code and make your life easier!
In this series, we’ll explore different types of loops, when to use them, and how to write clean, efficient code. With real-world examples, hands-on exercises, and a friendly vibe, you’ll breeze through these lessons—even if you’re just starting out! 🚀
What You Are Going to Learn
Here’s a sneak peek at the exciting lessons ahead:
🔄 Basic Loops:
- For Loop – Repeat tasks with a counter. Perfect for when you know how many times you need to loop.
- Foreach Loop – Ideal for cycling through arrays, lists, and collections. No messy counters—just smooth iterations!
- While Loop – Keep looping until a condition changes. Great for when you don’t know how many times to repeat.
- Do-While Loop – Similar to the while loop, but it always runs at least once.
⚡ Advanced Loops:
- Parallel.For – Speed things up by running loops simultaneously. Perfect for heavy tasks and large data sets.
- Parallel.ForEach – Like
foreach, but faster! Learn how to boost performance with parallel execution. - goto Loop – Explore this lesser-used loop for special cases. Use with caution—it can get tricky! 😅
🔁 Beyond Loops:
- Recursion – A function that calls itself? Mind-blowing! Discover how recursion can solve complex problems elegantly.
💻 Hands-On Practice:
- Programming Examples – See real-world scenarios with complete code and outputs.
- Programming Exercises – Test your skills with fun, challenging problems. Hints included to keep you motivated! 😉
Why Learn Loops in C#?
Loops are essential building blocks in programming. Without them, you’d be stuck writing repetitive code (and no one wants that!). By mastering loops, you’ll:
✅ Write cleaner, more efficient code
✅ Handle large amounts of data effortlessly
✅ Save time by automating repetitive tasks
✅ Build a strong foundation for more advanced C# concepts
Who Is This For?
Whether you’re a beginner exploring programming or someone brushing up on your skills, these lessons are crafted with you in mind. We keep things simple, interactive, and fun—because learning should never be boring! 😎
Ready to Start Your Loop Journey?
👉 Begin with the For Loop Lesson →
Let’s dive in and make looping in C# your new superpower! 💪
While loop
Syntax of While Loop in C#
Middleware Explained
Understand C# Code
Querying with EF Core
Basics of LINQ in EF Core
Filtering, Sorting, and Grouping
Aggregates (Sum, Count, Average, etc.)
Raw SQL Queries in EF Core
Web API Development
Model Binding & Validation in APIs
Testing with Swagger & Postman
Error Handling & Exception Filters
Methods, Classes & Objects (Basic)
Methods
📌 Basic Syntax of a Method in C#
🎯 Example 1 – A Simple Method (No Parameters, No Return Type)
🎯 Example 2 – Method with Parameters (Takes Input)
🎯 Example 3 – Method with Return Type (Gives Output Back)
XML and ADO.NET
Reading and Writing XML with DataSet
Working with DiffGram for Data Updates
Creating POCO Models
Understanding Dependency Injection (DI)
Understanding Variables
Advanced Features
Validation & Concurrency
Data Validation using Data Annotations
Concurrency Handling (RowVersion, Timestamp)
Optimistic vs Pessimistic Concurrency
Database with EF Core
Introduction to Entity Framework Core
Code-First Approach (Models & Migrations)
Database-First Approach (Scaffold Existing DB)
CRUD Operations in EF Core
Relationships (1-1, 1-M, M-M)
Async Programming in EF Core
Type Conversion
ADO.NET with ASP.NET
Using ADO.NET in ASP.NET MVC
Displaying Data in Razor Views
ADO.NET in Web API (Returning JSON)
Simple CRUD Application with ADO.NET
Data Annotations in Models
Understanding Configuration Files (appsettings.json)
Working with parameter
Parameter Arrays (params)
Optional & Named Parameters
Best Practices and Common Mistakes
Transactions & Unit of Work
SaveChanges vs SaveChangesAsync
Security & Identity
Authentication vs Authorization
ASP.NET Core Identity Basics
Policy-Based Authorization
JWT Authentication (for APIs)
External Logins (Google, Facebook, etc.)
Beyond ADO.NET
Comparing ADO.NET vs Entity Framework vs Dapper
When to Choose ADO.NET Over ORMs
Modern Use Cases of ADO.NET in Enterprise Apps
Fluent API Configuration
Programming Examples
Logging in ASP.NET Core
Array
Understanding Array
✅ 1. C# Array Example: Store Student Scores.
Multi dimensional array
🚀 Looping Through the 2D Array:
Example: Initializing and Accessing a 3D Array
Passing array as parameter
Returning Arrays from Methods
Sort, Search, Reverse, and Copy Arrays
Exception Handling
Nested & Multiple Catch
📝 Syntax for Nested Catch:
Complete system exception
Checked and unchecked statements
Performance Optimization
Tracking vs No-Tracking Queries
Best Practices for Performance
Advanced Features
Dependency Injection Advanced (Scoped, Singleton, Transient)
Background Services & Hosted Services
Globalization & Localization
SignalR for Real-Time Apps
Caching (In-Memory, Distributed, Response Caching)
Basic understandings of MVC
Complex Types and Value Objects
Programming Exercises
Testing with EF Core
Mocking DbContext for Unit Tests
Integration Testing with EF Core
File Handling - Basic
Introduction to File Handling
Deleting and Moving Files
Path Class
📂 Example 1: Extracting File Name and Extension
Exception Handling in File Operations
Best Practices and Common Mistakes in File Handling
🖥️ Output (if file doesn’t exist):
🖥️ Output (inside log.txt file after multiple runs):
🖥️ Output (inside transactions.log):
Testing & Debugging
Unit Testing in ASP.NET Core
Integration Testing in ASP.NET Core
Debugging Tips for Developers
Arithmetic operators
Insert Data (Add, AddRange)
Controllers – The Brain of Your App
File Handling - Advance
File Streams and Buffering
Asynchronous File Operations
File Compression and Decompression
Example 1: Compress a File Using GZipStream
Code: Compress a File
Example 2: Decompress a GZip File
Code: Decompress a File
Working with Temporary Files
File Access Permissions and Security
FileSystemWatcher - Realtime File Monitoring
Large Files and Memory Optimization
EF Core with ASP.NET Core
EF Core in MVC Controllers
EF Core in Web APIs (Returning JSON)
Dependency Injection of DbContext
Deployment & Hosting
Publishing ASP.NET Core App
Hosting on IIS, Linux, Docker
CI/CD with GitHub Actions or Azure DevOps
Configurations for Production
Performance Optimization in ASP.NET Core
Comparison operators
Read Data (LINQ Queries, Filtering, Paging)
Views – Displaying Data with Razor
⭐ A Bit More Razor Magic
✔️ Loop Example:
Alternatives & When Not to Use EF Core
Choosing the Right Data Access Strategy
Logical operators
Extras (Optional but Powerful)
Minimal APIs in ASP.NET Core
Blazor (Server & WASM) Basics
Microservices with ASP.NET Core
Health Checks in ASP.NET Core
Rate Limiting & Throttling
Update Data
OOPs - Classes, Methods & Objects
👋 Introduction:
Hey there, coding champ! 🌟 Ever wondered how large programs stay organized and easy to manage? Well, that’s where Classes in C# and Methods in C# come to the rescue! Think of classes as blueprints for creating objects, while methods are like instructions telling those objects what to do. Pretty cool, right? 😎
Imagine you’re designing a robot. The class is the robot’s blueprint, and the methods are the robot’s actions—like walk, talk, and dance! 💃🤖 This chapter will take you on a fun journey through classes, objects, and methods with easy words, real-world examples, and lots of hands-on coding. 🚀
📖 What You Are Going to Learn in This Chapter:
Here’s what’s lined up for you:
- 🏗️ Classes in C# – Understand how to create blueprints for your objects.
- 🏠 Constructor & Destructor – Learn how objects are built and cleaned up.
- 🧩 Static, Partial & Nested Class – Explore different types of classes and their uses.
- 🛡️ Access Modifiers in Classes – Control who can access what in your code.
- 🧬 Inheritance – Reuse code by inheriting features from other classes.
- 🧸 Objects in C# – Bring your classes to life by creating objects.
- 📝 Methods in C# – Discover how to define actions for your objects.
- 🌱 Best Practices for Writing Clean Classes and Methods – Write neat and maintainable code.
- 🚫 Common Mistakes to Avoid with Classes and Methods – Steer clear of common pitfalls.
Each lesson is designed to be simple, fun, and packed with examples that make sense. Plus, you’ll get practical tips along the way. You got this! 💪
🏁 Conclusion:
By the end of this chapter, you’ll have a solid grip on Classes in C# and Methods in C#. You’ll know how to build structured programs, reuse code efficiently, and write clean, understandable code. 💻✨ Just remember: practice is the key! Even if you stumble, keep going—every coder starts somewhere. 🚀
📅 Next What?
Woohoo! 🎉 You’re about to dive deep into each topic and get your hands dirty with code. In the next lesson, we’ll kick things off with Classes in C#—the backbone of object-oriented programming. Get ready to create your first class and see how it all works in action! 🙌
Static, Partial & Nested Class
Access Modifiers in Classes
Best Practices for Writing Clean Classes and Methods
Models – Handling Data and Logic
OOPs - Constructors & Destructors
Destructor (~)
🖥️ Output (May vary due to Garbage Collection timing):
Increment and Decrement Operators
Delete Data
Introduction to Controllers
Assignment operators
OOPs - Encapsulation
Change Tracking Explained
Routing in Controllers
Conditional Operator
One-to-One Relationship
OOPs - Abstraction
Abstraction in C#
💻 Example 1 – Abstract Class in C# 🚀
Example of Interface in C# 🚗
Abstract Class vs Interface – What’s the Difference? ⚖️
🌍 Real-World Example – Online Payment System
Best Practices and Guidelines
Handling HTTP Requests (GET, POST, PUT, DELETE)
Action Methods Explained
OOPs - Interface
Best Practices & Common Mistakes
1️⃣ Use Interfaces for Defining Behavior, Not Implementation
✅ Good Practice
❌ Bad Practice (Interfaces should not have fields)
❌ Bad Practice (Too Many Responsibilities)
1️⃣ Not Implementing All Methods in an Interface
Programming examples
One-to-Many Relationship
Returning Results (ViewResult, JsonResult, RedirectResult)
OOPs - Inheritance
Inheritance in C#
🧐 How Inheritance is Used Here
1️⃣ Creating a Parent Class (Vehicle)
2️⃣ Creating a Child Class (Car)
base, virtual, override, and new keyword
5️⃣ Full Example Showing override vs new
Access Specifiers in Inheritance
Abstract and Virtual methods
3️⃣ Abstract Method vs. Virtual Method – Key Differences
Method Overriding vs Method Hiding
✅ Hiding Example – Advanced Calculator with new
Constructors vs Inheritance
Programming exercises
Many-to-Many Relationship
Controller Parameters & Model Binding
💻 Code Example (with Clear Output)
Example Controller
📤 Expected Outputs
🔵 Output of /User/GetUser?name=Rahul&age=25
OOPs - Polymorphism
Compile-time Polymorphism (Method Overloading)
Runtime Polymorphism (Method Overriding)
📝 Syntax of Method Overriding in C#
🚀 Use virtual in the parent class and override in the child class!
Polymorphism with Interfaces
Polymorphism with Abstract Classes
📝 Syntax of Abstract Classes in C#
💻 Example 1: Polymorphism with Abstract Classes in C#
Member Access Operators
Navigation Properties
Error Handling in Controllers
OOPs - Abstract Classes
Abstract Classes in C#
⚡ Example 1: Basic Abstract Class in C#
🏆 Example 2: Abstract Class with Concrete Methods
Abstract Classes vs Interfaces
Abstract Classes with Constructors
🎯 Simple Example of Abstract Class with Constructor
Bitwise Operators
Loading Related Data (Eager, Lazy, Explicit)
Introduction to Views
Delegate and Events
Delegates in C#
📝 Step-by-Step Explanation:
2️⃣ Create a Method That Matches the Delegate Signature:
3️⃣ Assign the Method to the Delegate:
📝 Step-by-Step Explanation:
2️⃣ Create the First Method:
3️⃣ Create the Second Method:
4️⃣ Assign the First Method to the Delegate:
5️⃣ Add the Second Method (Multi-Casting):
📝 Step-by-Step Explanation:
1️⃣ Creates an Action delegate:
2️⃣ Invokes the delegate:
Multicast Delegates
Syntax of Multicast Delegates in C#
Simple Example of Multicast Delegates in C#
Another Example: Logging System 📝
Built-in Delegates
Syntax of Built-in Delegates in C#
C# is and as Operator
C# is and as Operator – Easy Guide with Examples
Razor Syntax Basics
C# Generics
Generic Methods in C#
✨ Example 1: A Simple Generic Method
🏗 Example 2: Swapping Two Values Using Generics
Generics List<T>
📌 Example Code Using These Methods
Generics LinkedList<T>
Example: Creating a LinkedList of Strings
Generics Dictionary<TKey, TValue>
Example: Creating a Dictionary of Student Scores
🛠️ Code Breakdown: Line by Line
1️⃣ using System; & using System.Collections.Generic;
2️⃣ Creating a Dictionary
3️⃣ Adding Key-Value Pairs (Student Names & Scores)
4️⃣ Accessing a Value from Dictionary
What Happens If the Key Doesn’t Exist?
📌 Important Methods of Generics Dictionary<TKey, TValue> in C#
💡 Example 1: Working with Dictionary Methods
Generic Queue<T>
Syntax of Generics Queue<T> in C#
2️⃣ Adding People to the Queue (Enqueue)
4️⃣ Removing the First Person (Dequeue)
5️⃣ Checking the Next Person in Line (Peek)
📌 Important Methods of Queue<T>
Generic Stack<T>
🎯 Example 1: Creating and Using a Stack<T> in C#
🔥 Important Methods of Stack<T> in C#
💡 Example 2: Checking if an Item Exists in Stack
💡 Example 3: Reversing a String Using Stack<T> in C#
Generics HashSet<T>
🚀 Example 1: Basic HashSet<T> in C#
Lambda Expression Operator
Layouts (Master Pages)
C# Threads
Introduction to Threads
👎 Without Threads (Single-threaded)
👍 With Threads (Multi-threaded)
Thread Lifecycle and Management
✅ Example: Checking Thread States
🔥 Foreground vs. Background Threads in C#
🟢 Example 1: Foreground Thread (Keeps Running Until Completion)
🔵 Example 2: Background Thread (Stops When Main Thread Ends)
🎯 Key Differences Between Foreground and Background Threads
✅ Example: Manually Pausing and Resuming a Thread
✅ Checking if a Thread is Alive (IsAlive property)
✅ Example: Auto-Save with Background Thread
Thread Synchronization and Safety
Lock & Monitor
🤔 When to Use lock vs. Monitor?
Mutex, Semaphore & SemaphoreSlim
🤔 Mutex vs Semaphore vs SemaphoreSlim
AutoResetEvent and ManualResetEvent
🤔 AutoResetEvent vs ManualResetEvent – What’s the Difference?
Deadlocks and common pitfalls
Thread Pooling
🔄 Thread Pooling vs Manual Thread Creation
Multithreading
🚀 Example 1: Creating a Simple Thread in C#
✅ Basic Code Example
🎯 Example 2: Running Multiple Threads
✅ Code Example
Understanding TPL
🚀 Example 1: Creating a Simple Task
✅ Code Example
🎯 Example 2: Running Multiple Tasks in Parallel
✅ Code Example
Index and Range Operators
Partial Views (Reusable UI Blocks)
Create a file named _UserCard.cshtml inside:
Delegate Operators
Tag Helpers in Views
Async/Await Operator
Passing Data to Views
Passing Data Using ViewData
Passing Data Using ViewBag
Passing Data Using TempData
Passing Data Using Strongly Typed Models
Ref and Out Parameters
View Components (Mini Controllers for UI)
Checked and Unchecked Operators
What is a Model?
Sizeof Operator
Creating Simple Models (POCO classes)
Stackalloc Operator
Strongly Typed Models with Views
Dynamic Operator
Validation in Models (Data Annotations)
Null-Coalescing Operators
Model Binding in Detail (Form Data, Query String, Route Data)
Null-Conditional Operators
Using Models with EF Core (Database Integration)
Method Group Operator
var
Introduction to Razor Pages
const
Writing Razor Syntax (Inline C#, Loops, Conditions)
this
Creating a Simple Razor Page Example
Introduction to Web API
Block & Empty
Routing in Web API
Goto Label
Model Binding & Validation in APIs
Break & Continue
Returning JSON & XML
Return
Testing with Swagger & Postman
Throw
API Versioning
Checked
1. Checked Statement
Alright, let’s keep it simple! Imagine you’re carrying a glass full of water. If you keep pouring more water into it, at some point, it overflows and makes a mess. Now, what if you had a magical cup that warns you before it spills? That’s exactly what a checked statement does in C#!
When you’re working with numbers in programming, sometimes they get too big and overflow—like when a water glass can’t hold more liquid. If you don’t check for overflow, the number might turn into something completely unexpected (like negative when it should be positive). That’s a disaster, right?
This is where the checked statement comes to the rescue! It monitors your numbers and if an overflow happens, it stops the program and throws an error. That way, you know something went wrong instead of letting weird numbers ruin your calculations.
Why Use a Checked Statement?
Here are some real-world reasons why you should use it:
✅ Prevents unexpected results – Without checking, a number can flip to something completely wrong.
✅ Catches mistakes early – Instead of hunting down weird bugs later, your program stops immediately when an overflow happens.
✅ Great for important calculations – If you’re dealing with money, scores, or anything critical, you don’t want errors slipping through.
✅ Makes debugging easier – You’ll immediately know where the problem is, rather than scratching your head over mysterious numbers.
When Should You Use It?
👉 When working with large numbers – If your numbers grow big fast, better be safe than sorry.
👉 When precision matters – Financial apps, game scores, or scientific calculations should always be checked.
👉 When you want safer code – It helps you avoid sneaky bugs that can break your program later.
In short, a checked statement is like a safety net—it protects your program from number overflow disasters! 🚀
Alright, imagine you’re filling a water glass again. But this time, instead of stopping when it overflows, you just keep pouring—and whatever spills, spills. No warnings, no stopping, just let it happen. That’s exactly what an unchecked statement does in C#!
When numbers get too big in programming, they overflow. Without any checks, the program just keeps running, even if the number turns into something completely unexpected. Instead of throwing an error, it silently ignores the problem, which might lead to weird results later.
Why Use an Unchecked Statement?
There are a few reasons why you might let things slide instead of stopping the program:
✅ Faster execution – Without checking for overflow, your program runs slightly quicker.
✅ You know what you’re doing – If you’re handling values that are safe, checking might be unnecessary.
✅ You don’t care about overflow – Sometimes, you just want to let numbers wrap around and move on.
When Should You Use It?
👉 When performance matters – If you’re doing a lot of number crunching and need speed, unchecked might help.
👉 When overflow isn’t a big deal – If the result doesn’t break your logic, you can ignore it.
👉 When you’re working with non-critical data – For example, in small calculations where a wrong value won’t cause a disaster.
But be careful! An unchecked statement is like driving without seat belts—it might be fine most of the time, but when things go wrong, they go really wrong. So, use it wisely! 😃
Unchecked Example (Ignores Overflow)
Error Handling & Exception Filters
Lock
Introduction to Entity Framework Core
Using
Code-First Approach (Models & Migrations)
Enum
Database-First Approach (Scaffold Existing DB)
Structure
CRUD Operations in EF Core
Variable Scope
Constructor & Destructor
Relationships (1-1, 1-M, M-M)
Sizeof
Using LINQ with EF Core
Nameof
Async Programming in EF Core
Alias
Authentication vs Authorization
Async & Await
ASP.NET Core Identity Basics
Sealed
Example: Sealed Class Restricting Inheritance
Register, Login, Logout
Dynamic
Role-Based Authorization
Global
File 2: Person.cs (No Need to Include ‘using System’)
File 3: Program.cs (No Need to Include ‘using System’)
Policy-Based Authorization
Required
JWT Authentication (for APIs)
Iterators
External Logins (Google, Facebook, etc.)
Securing Web APIs
Yield
Custom Middleware
If-else
Action Filters
Switch case (Classic)
Dependency Injection Advanced (Scoped, Singleton, Transient)
Switch Expression (C# 8.0+)
Syntax of Switch Expression in C#
File Uploads & Downloads
Pattern Matching in switch (C# 9.0+)
Sending Emails
Switch with when Clause
Background Services & Hosted Services
Advanced Conditional Statement
Globalization & Localization
Programming examples
SignalR for Real-Time Apps
Programming exercises
Caching (In-Memory, Distributed, Response Caching)
For loop
Unit Testing in ASP.NET Core
Foreach loop
Integration Testing in ASP.NET Core
While loop
Syntax of While Loop in C#
Mocking with Moq
Do while loop
Debugging Tips for Developers
Parallel.For
Publishing ASP.NET Core App
Parallel.ForEach
Hosting on IIS, Linux, Docker
goto loop
CI/CD with GitHub Actions or Azure DevOps
Recursion
Configurations for Production
Programming examples
Performance Optimization in ASP.NET Core
Programming exercises
Methods
📌 Basic Syntax of a Method in C#
🎯 Example 1 – A Simple Method (No Parameters, No Return Type)
🎯 Example 2 – Method with Parameters (Takes Input)
🎯 Example 3 – Method with Return Type (Gives Output Back)
Minimal APIs in ASP.NET Core
Classes
gRPC in ASP.NET Core
Objects
Blazor (Server & WASM) Basics
Microservices with ASP.NET Core
Understanding parameter
Health Checks in ASP.NET Core
Value type parameter
Rate Limiting & Throttling
Reference type parameter
Output parameter
Parameter Arrays (params)
Optional & Named Parameters
Command-line argument
Best Practices and Common Mistakes
Understanding Array
✅ 1. C# Array Example: Store Student Scores.
Single Dimensional Array
Multi dimensional array
🚀 Looping Through the 2D Array:
Example: Initializing and Accessing a 3D Array
Jagged Arrays
Iterating Through Arrays
Passing array as parameter
Returning Arrays from Methods
Sort, Search, Reverse, and Copy Arrays
Array Class in C#
Exception Overview
Common Exceptions
Try Catch Finally
Throw statements
User defined exception
Nested & Multiple Catch
📝 Syntax for Nested Catch:
Complete system exception
Checked and unchecked statements
Introduction to File Handling
System.IO Namespace
Creating Files in C#
Writing to Files in C#
Appending Data to Files
Reading from Files in C#
Deleting and Moving Files
Working with Directories
Path Class
📂 Example 1: Extracting File Name and Extension
Exception Handling in File Operations
Best Practices and Common Mistakes in File Handling
🖥️ Output (if file doesn’t exist):
🖥️ Output (inside log.txt file after multiple runs):
🖥️ Output (inside transactions.log):
File Streams and Buffering
Binary File Handling
Asynchronous File Operations
File Compression and Decompression
Example 1: Compress a File Using GZipStream
Code: Compress a File
Example 2: Decompress a GZip File
Code: Decompress a File
Working with Temporary Files
File Access Permissions and Security
FileSystemWatcher - Realtime File Monitoring
Large Files and Memory Optimization
Classes in C#
Objects in C#
Static, Partial & Nested Class
Access Modifiers in Classes
Constructor & Destructor
Inheritance
Methods in C#
Best Practices for Writing Clean Classes and Methods
Constructor
Types of Constructors
Constructor overloading
Destructor (~)
🖥️ Output (May vary due to Garbage Collection timing):
Dispose() Method
Understanding concepts
Access Specifiers
Public
Private
Protected
Internal
Protected Internal
GET SET
Abstraction in C#
💻 Example 1 – Abstract Class in C# 🚀
Example of Interface in C# 🚗
Abstract Class vs Interface – What’s the Difference? ⚖️
🌍 Real-World Example – Online Payment System
Best Practices and Guidelines
Interfaces in C#
Best Practices & Common Mistakes
1️⃣ Use Interfaces for Defining Behavior, Not Implementation
✅ Good Practice
❌ Bad Practice (Interfaces should not have fields)
❌ Bad Practice (Too Many Responsibilities)
1️⃣ Not Implementing All Methods in an Interface
Inheritance in C#
🧐 How Inheritance is Used Here
1️⃣ Creating a Parent Class (Vehicle)
2️⃣ Creating a Child Class (Car)
base, virtual, override, and new keyword
5️⃣ Full Example Showing override vs new
Types of Inheritance
Access Specifiers in Inheritance
Abstract and Virtual methods
3️⃣ Abstract Method vs. Virtual Method – Key Differences
Method Overriding vs Method Hiding
✅ Hiding Example – Advanced Calculator with new
Constructors vs Inheritance
Sealed Inheritance
Polymorphism in C#
Compile-time Polymorphism (Method Overloading)
Runtime Polymorphism (Method Overriding)
📝 Syntax of Method Overriding in C#
🚀 Use virtual in the parent class and override in the child class!
Polymorphism with Interfaces
Polymorphism with Abstract Classes
📝 Syntax of Abstract Classes in C#
💻 Example 1: Polymorphism with Abstract Classes in C#
Abstract Classes in C#
⚡ Example 1: Basic Abstract Class in C#
🏆 Example 2: Abstract Class with Concrete Methods
Abstract Methods in C#
Abstract Classes vs Interfaces
Abstract Classes with Constructors
🎯 Simple Example of Abstract Class with Constructor
Delegates in C#
📝 Step-by-Step Explanation:
2️⃣ Create a Method That Matches the Delegate Signature:
3️⃣ Assign the Method to the Delegate:
📝 Step-by-Step Explanation:
2️⃣ Create the First Method:
3️⃣ Create the Second Method:
4️⃣ Assign the First Method to the Delegate:
5️⃣ Add the Second Method (Multi-Casting):
📝 Step-by-Step Explanation:
1️⃣ Creates an Action delegate:
2️⃣ Invokes the delegate:
Multicast Delegates
Syntax of Multicast Delegates in C#
Simple Example of Multicast Delegates in C#
Another Example: Logging System 📝
Events in C#
Built-in Delegates
Syntax of Built-in Delegates in C#
Introduction to Generic
Generic Classes in C#
Generic Methods in C#
✨ Example 1: A Simple Generic Method
🏗 Example 2: Swapping Two Values Using Generics
Generics List<T>
📌 Example Code Using These Methods
Generics LinkedList<T>
Example: Creating a LinkedList of Strings
Generics Dictionary<TKey, TValue>
Example: Creating a Dictionary of Student Scores
🛠️ Code Breakdown: Line by Line
1️⃣ using System; & using System.Collections.Generic;
2️⃣ Creating a Dictionary
3️⃣ Adding Key-Value Pairs (Student Names & Scores)
4️⃣ Accessing a Value from Dictionary
What Happens If the Key Doesn’t Exist?
📌 Important Methods of Generics Dictionary<TKey, TValue> in C#
💡 Example 1: Working with Dictionary Methods
Generic Queue<T>
Syntax of Generics Queue<T> in C#
2️⃣ Adding People to the Queue (Enqueue)
4️⃣ Removing the First Person (Dequeue)
5️⃣ Checking the Next Person in Line (Peek)
📌 Important Methods of Queue<T>
Generic Stack<T>
🎯 Example 1: Creating and Using a Stack<T> in C#
🔥 Important Methods of Stack<T> in C#
💡 Example 2: Checking if an Item Exists in Stack
💡 Example 3: Reversing a String Using Stack<T> in C#
Generics HashSet<T>
🚀 Example 1: Basic HashSet<T> in C#
Introduction to Threads
👎 Without Threads (Single-threaded)
👍 With Threads (Multi-threaded)
Working with Threads
Thread Lifecycle and Management
✅ Example: Checking Thread States
🔥 Foreground vs. Background Threads in C#
🟢 Example 1: Foreground Thread (Keeps Running Until Completion)
🔵 Example 2: Background Thread (Stops When Main Thread Ends)
🎯 Key Differences Between Foreground and Background Threads
✅ Example: Manually Pausing and Resuming a Thread
✅ Checking if a Thread is Alive (IsAlive property)
✅ Example: Auto-Save with Background Thread
Thread Synchronization and Safety
Lock & Monitor
🤔 When to Use lock vs. Monitor?
Mutex, Semaphore & SemaphoreSlim
🤔 Mutex vs Semaphore vs SemaphoreSlim
AutoResetEvent and ManualResetEvent
🤔 AutoResetEvent vs ManualResetEvent – What’s the Difference?
Deadlocks and common pitfalls
Thread Pooling
🔄 Thread Pooling vs Manual Thread Creation
Multithreading
🚀 Example 1: Creating a Simple Thread in C#
✅ Basic Code Example
🎯 Example 2: Running Multiple Threads
✅ Code Example
Understanding TPL
🚀 Example 1: Creating a Simple Task
✅ Code Example
🎯 Example 2: Running Multiple Tasks in Parallel
✅ Code Example
Parallel Programming