- Design Master Page Layout using CSS HTML Template in MVC 5.
Are you looking for a way to design MVC application with your favorite CSS Theme? There are thousands of stunning and responsive themes are available for free or paid license. So, you don't need to always design your own theme to work with. You can download or buy those themes and customize in your MVC Project. In this article, I will show you step by step guideline with picture for adding external CSS and template in your MVC project. I am using here MVC 5 for designing Master Page with CSS Template. But it doesn't matter what version of MVC you are using. The processes are almost same.
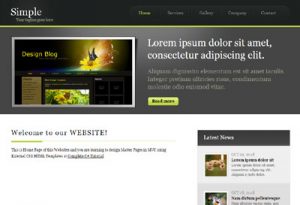
So you need a CSS Template to work with. I have downloaded a free CSS theme and customize them in MVC. Download this simple CSS HTML theme and learn how to design MVC project using this template.
Download this CSS HTML Template for Demo Project
 Download Theme
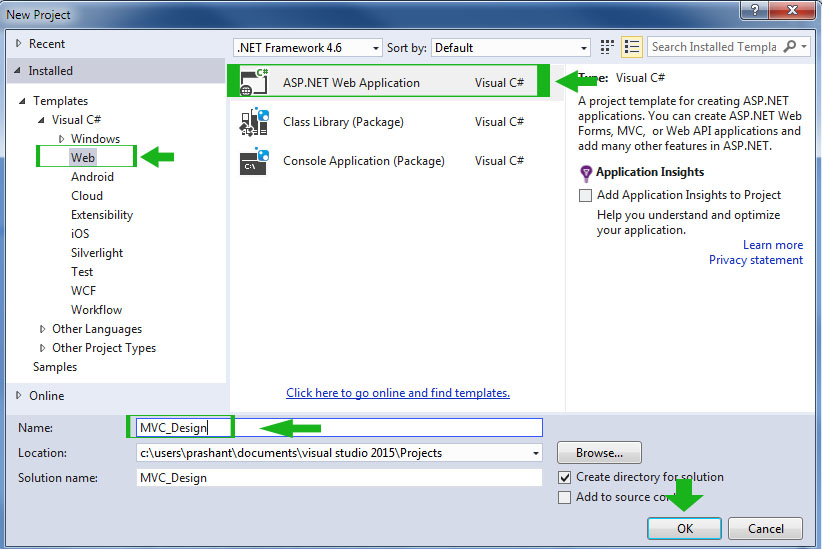
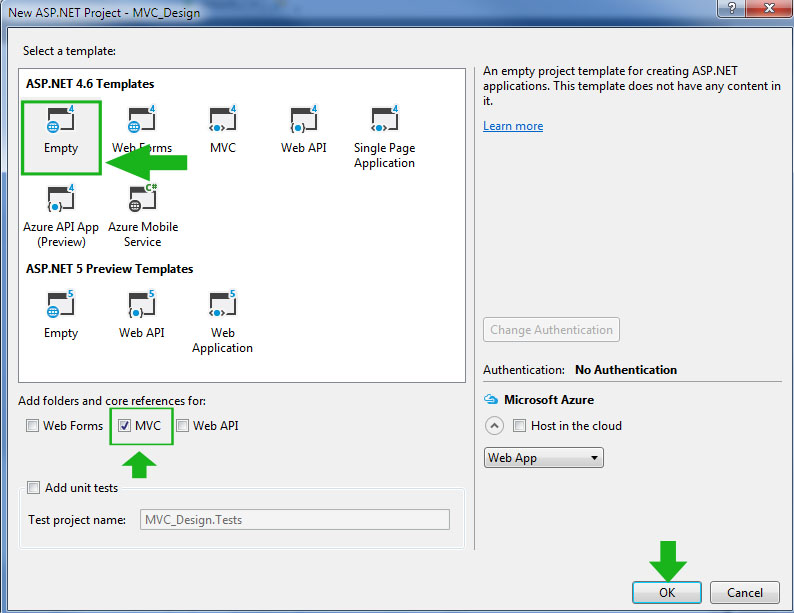
Step 1. Start a New Empty MVC 5 Project. Go to File New Project. Select Web in Left side and then Select ASP.NET Web Application as your project. Give the name of your project MVC_Design and click OK.
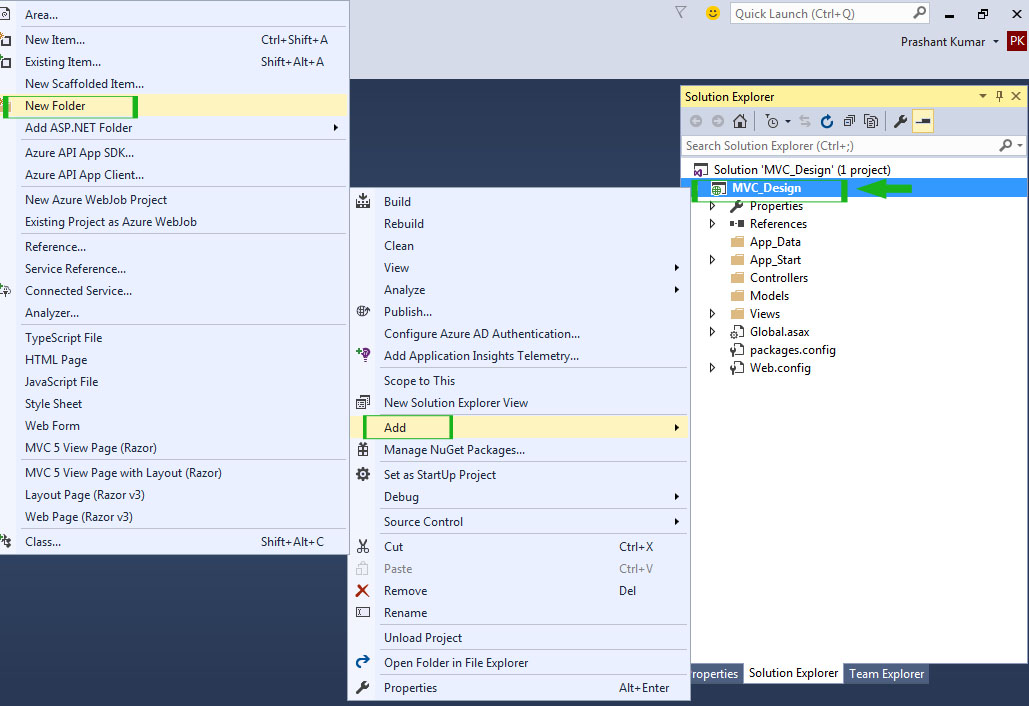
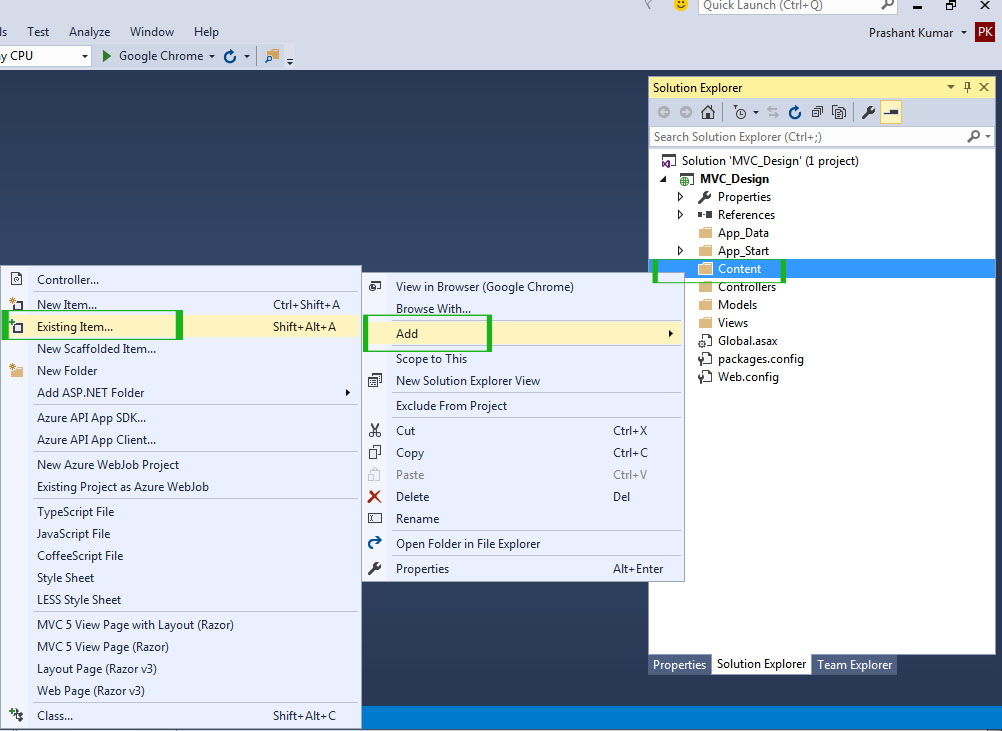
Right click on Project Name MVC_Design Add New Folder. Give folder name 'Content' and click OK.
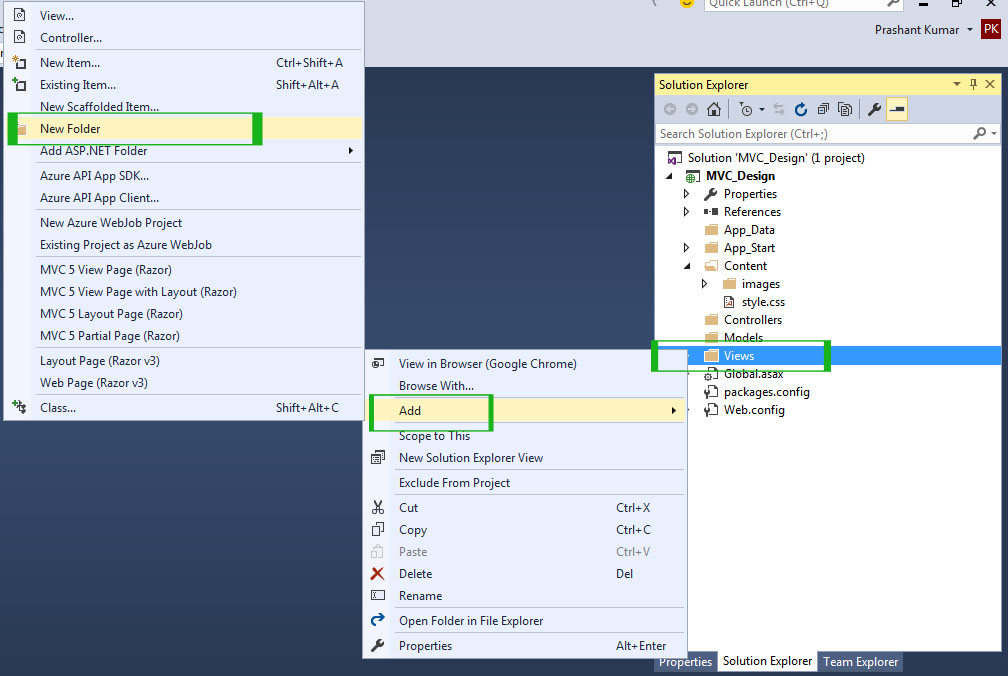
Home – It keeps all your website pages like Index, Service, About, Contact, Company etc.
Shared – This folder keeps Layout page, Master page, Shared section like header, footer, sidebar, menu etc.
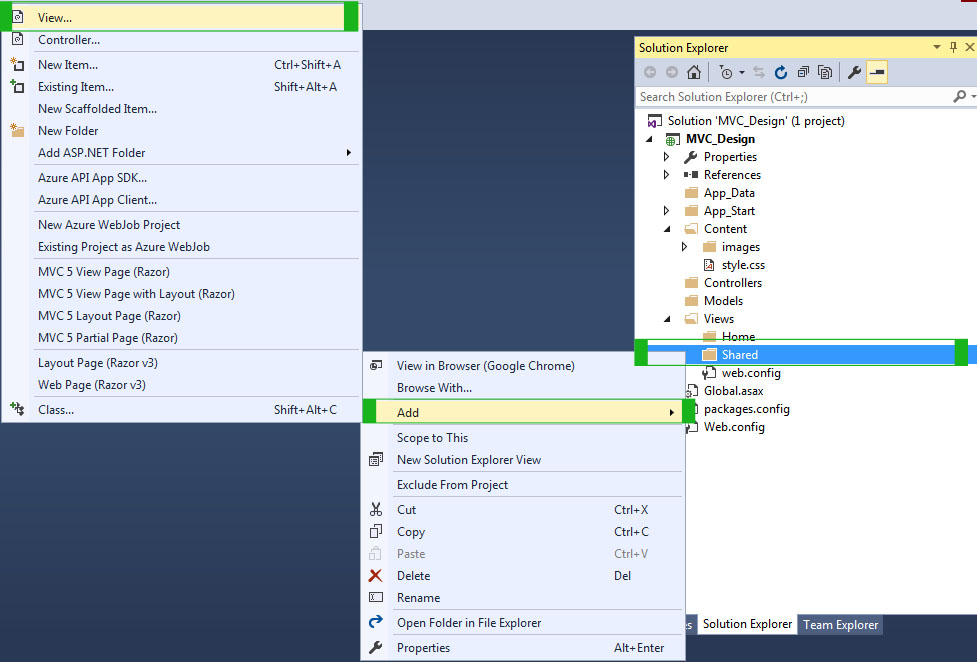
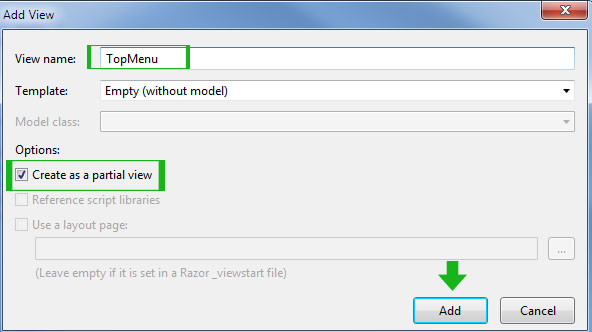
Right click on Shared folder Add View.
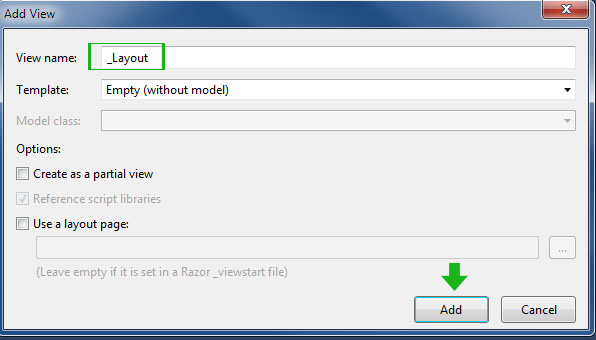
 Give the View name as _Layout and keep all the option same as shown in this picture.
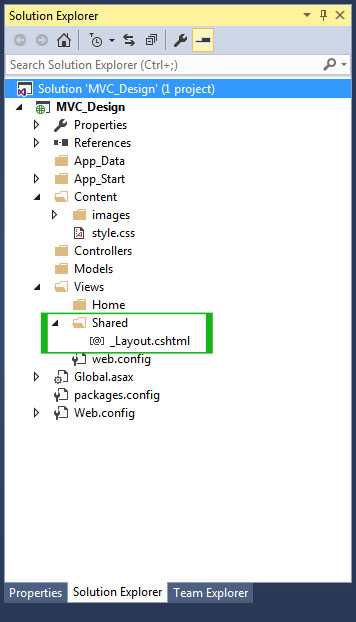
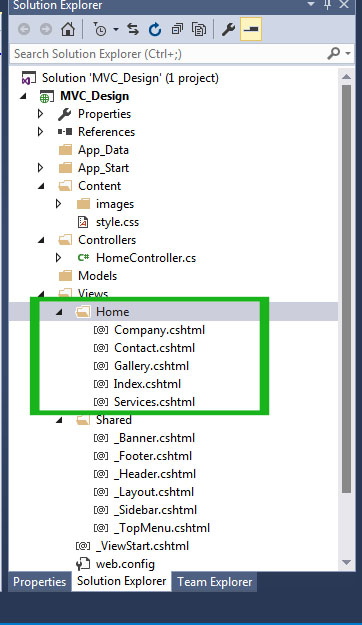
Till now, you have added all the necessary files and folders in your project. Your solution explorer should look like this.
Coding
It's time to break you index page code into several partial pages. For example, Header, footer and sidebar are the common in all the pages. So I will break the index page into several necessary partial pages. How, see these steps.
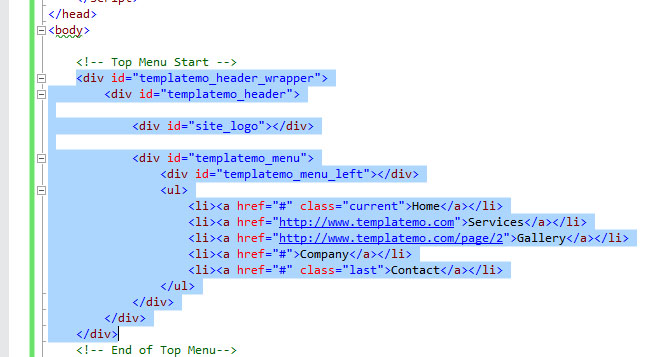
Now return back to _Layout.cshtml and add this code at the place of TopMenu.
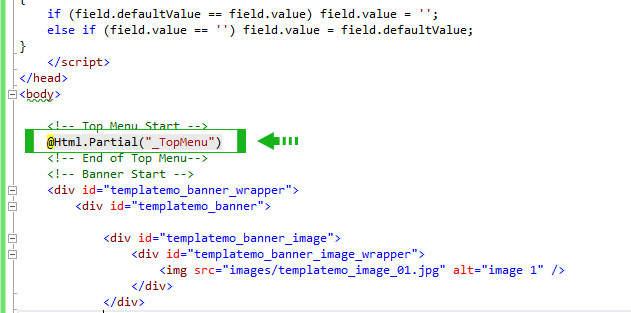
@Html.Partial("_TopMenu")
Now your _Layout.cshtml page will looks like this.

@RenderSection("metatags", false) – It allows you to add meta tag for pages.@RenderBody() – It allows you to add separate content for each pages.Congratulations! You have created Master Page Layout Successfully. Now, it's time to add pages for your website.
<meta http-equiv="Content-Type" content="text/html; charset=utf-8" />
<title>@ViewBag.Title</title>
<link href="@Url.Content("~/Content/style.css")" rel="stylesheet" type="text/css" />
<!--
It is Unnecessary so Comment it or delete it.

<script language="javascript" type="text/javascript">
function clearText(field)
{
    if (field.defaultValue == field.value) field.value = '';
    else if (field.value == '') field.value = field.defaultValue;
}
</script>
-->
@ViewBag.Title – This code allows adding separate title for each page.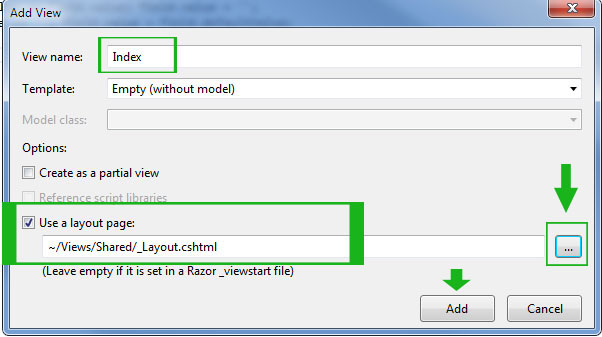 Your Index.cshtml page will look like this.
@{
    ViewBag.Title = "Index";
    Layout = "~/Views/Shared/_Layout.cshtml";
}
@section metatags
{
    <meta name="description" content="Index Page" />
    <meta name="keywords" content="Index Keyword" />
}
@section metatags
{
    <meta name="description" content="Your Page Name" />
    <meta name="keywords" content="Your Page Keyword" />
}_Sidebar.csthml – Correct all the images path by adding ~/Content/ prefix in the path.
Example
images/templatemo_image_01.jpg
to
~/Content/images/templatemo_image_01.jpg
<div id="templatemo_header_wrapper">
    <div id="templatemo_header">

        <div id="site_logo"></div>

        <div id="templatemo_menu">
            <div id="templatemo_menu_left"></div>
            <ul>
                <li><a href="~/Home/Index">Home</a></li>
                <li><a href="~/Home/Services">Services</a></li>
                <li><a href="~/Home/Gallery">Gallery</a></li>
                <li><a href="~/Home/Company">Company</a></li>
                <li><a href="~/Home/Contact">Contact</a></li>
            </ul>
        </div>
    </div>
</div>using System;
using System.Collections.Generic;
using System.Linq;
using System.Web;
using System.Web.Mvc;
namespace MVC_Design.Controllers
{
public class HomeController : Controller
{
// GET: Home
public ActionResult Index()
{
return View();
}
public ActionResult Services()
{
return View();
}
public ActionResult Gallery()
{
return View();
}
public ActionResult Company()
{
return View();
}
public ActionResult Contact()
{
return View();
}
}
}That's It. You have designed your Master Web Pages in MVC 5 with External CSS HTML Template. Now, debug your program and enjoy Output. You will see that website has regular look for all the pages. The header, footer, and sidebar are same for all the pages but content area is different.
If you face any problem creating Master Page Layout in MVC feel free to ask your query in Comment.
If this article is helpful for you to Please like our Facebook Page.