Complete C# Tutorial

Set up C# development environment: Visual Studio vs VSCode vs Online

  • Best way to write and run C# code using IDE, CLI, or online compilers.
  • How to run C# code directly in your browser?
  • Set up C# development environment – Visual Studio vs VSCode vs Notepad IDE
  • How to run C# code using just Notepad and the command line?
  • Best online compilers to write and run C# code?

C# is a popular programming language. You need a place to write and run your code. Here are some common options:

  1. Visual Studio – This is the best tool for C# development. It has many features like debugging and IntelliSense.

  2. Visual Studio Code – This is a lightweight editor. You need to install the C# extension to run code.

  3. Online Compilers – Websites like .NET Fiddle and Replit let you write and run C# code in a web browser.

  4. Command Line with .NET SDK – If you install the .NET SDK, you can create and run C# programs using the command line with dotnet run.

Choose the option that best fits your needs!

Set up C# development environment - Which One Should You Use?

  • If you want full features, use Visual Studio.List Item

  • If you want a light editor, use Visual Studio Code.

  • If you don’t want to install anything, use online compilers.

  • If you like commands, use .NET SDK.

Choose the best option and start coding in C#!

Step 1: Download Visual Studio 2022

  1. Open your web browser and go to the official Visual Studio website.
  2. Click on the “Download Visual Studio” button.
  3. Choose “Visual Studio Community 2022” (it’s free).

Step 2: Run the Installer

  1. Open the downloaded file (VisualStudioSetup.exe).
  2. If asked, click “Yes” to allow changes to your computer.
  3. The Visual Studio Installer will open. Click “Continue” to start downloading the necessary files.

Step 3: Choose Workloads

  1. Once the installer loads, you will see different workload options.
  2. For C# development, check these workloads:
    • “.NET Desktop Development” (for Windows apps)
    • “ASP.NET and Web Development” (for web apps) (optional)
    • “.NET Core Cross-Platform Development” (optional but useful)
  3. Click “Install” at the bottom right.

Step 4: Wait for Installation

  1. Visual Studio will download and install the selected components.
  2. This may take some time, depending on your internet speed.

Step 5: Launch Visual Studio

  1. After installation, click “Launch” or open Visual Studio 2022 from the Start menu.
  2. You may need to sign in with a Microsoft account (optional).
  3. Click “Create a New Project” to start coding in C#!

Step 1: Download and Install VS Code

  1. Go to the official VS Code website.
  2. Click “Download for Windows” (or choose Mac/Linux if needed).
  3. Open the downloaded file (VSCodeSetup.exe) and follow the installation steps.

Step 2: Install .NET SDK (Required for C#)

  1. Go to the official .NET SDK page.
  2. Click “Download .NET SDK” for your system.
  3. Run the installer and complete the setup.

To check if .NET is installed, open Command Prompt and type:

C:\Users\StevenClark> dotnet --version
9.0.102

If you see a version number, .NET is installed successfully.

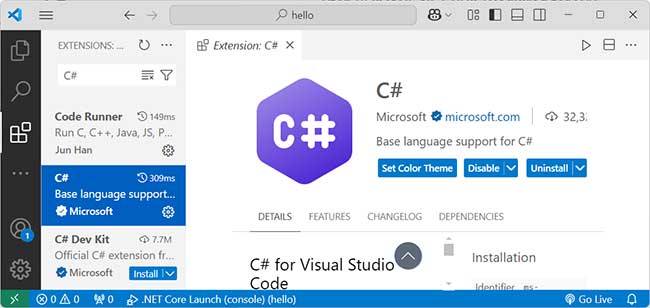
Step 3: Install C# Extension in VS Code

  1. Open Visual Studio Code.
  2. Click on the Extensions icon (or press Ctrl + Shift + X).
  3. Search for "C#".
  4. Click "Install" on the C# extension by Microsoft.

VS Code Csharp Extension

Step 4: Create a New C# Console Project

  1. Open Command Prompt (Win + R, type cmd, and press Enter).
  2. Go to the folder where you want to create the project (e.g., Documents):
    cd Documents
    
  3. Run the following command to create a new C# console app:
    dotnet new console -n MyFirstApp
    
    This will create a folder named MyFirstApp with a basic C# project.

Step 5: Open the Project in VS Code

  1. Go back to VS Code.
  2. Click File > Open Folder and select the MyFirstApp folder.
  3. Open the Program.cs file to see the default C# code.

Step 6: Run Your C# Code in VS Code

  1. Open Terminal in VS Code (Ctrl + ~).
  2. Run the following command to execute the program:
    dotnet run
  3. You should see "Hello, World!" printed in the terminal.

You have successfully installed and set up VS Code for C# development. Now, you can start writing and running C# programs!

This guide will show you how to write, compile, and run a C# program using 🗎 Notepad and Command Line (CLI) without using an IDE like Visual Studio.

Step 1: Check if .NET is Installed:

  1. Open Command Prompt (Win + R, type cmd, and press Enter).
  2. Type the following command and press Enter:
    dotnet --version
  3. If you see a version number, .NET is installed. If not, download and install it from here:
    👉 Download .NET SDK

Step 2: Create a C# File Using Notepad

  1. Open Notepad (Win + R, type notepad, and press Enter).

  2. Copy and paste the following C# code:

    using System;
    
    class Program
    {
        static void Main()
        {
            Console.WriteLine("Hello, World!");
            Console.Write("Enter your name: ");
            string name = Console.ReadLine();
            Console.WriteLine("Hello, " + name + "!");
        }
    }
    
  3. Click File > Save As...

  4. Choose a folder (e.g., C:\Users\YourName\Documents\CSharpDemo\).

  5. Set File name: Program.cs

  6. Select Save as type: All Files (*.*)

  7. Click Save.

Step 3: Open Command Prompt and Navigate to the Folder

  1. Open Command Prompt (Win + R, type cmd, and press Enter).
  2. Use the cd command to go to the folder where you saved the file:
    cd C:\Users\YourName\Documents\CSharpDemo

Step 4: Compile the C# Program Using .NET CLI

  1. Run the following command to compile the program:

    dotnet new console --force

    This sets up the necessary .NET project files.

  2. Now, compile the code:
    dotnet build

    If there are no errors, the program is successfully compiled!

Step 5: Run the C# Program

After compilation, run the program using:

dotnet run

Now, you should see this output in the terminal:

Hello, World! 
Enter your name:

Enter your name, press Enter, and it will respond with:

Hello, [YourName]!


Step 6: Running C# Code Without dotnet CLI (Optional)

If you want to run C# without dotnet run, use the csc (C# compiler) command:

  1. Compile the program using CSC (C# Compiler)

    csc Program.cs

    This creates an executable file (Program.exe).
  2. Run the Executable

    Program.exe
  3. This will execute the program without using dotnet run.

If you want to run C# code online without installing any software, online C# compilers are a great option. They allow you to write, compile, and execute C# programs quickly.

However, not all online compilers offer the same features. Some are better for debugging, while others focus on speed and ease of use.

In this comparison, we analyze four of the best online C# compilers:


MyCompiler – Fast and beginner-friendly
.NET Fiddle – Best for C# with NuGet support
OneCompiler – Simple and quick for testing
OnlineGDB – Best for debugging with user input support

Each compiler has its own strengths and weaknesses. Below is a detailed comparison, including pros, cons, and ratings to help you choose the best one for your needs!


Leave a Comment

Share this Doc

Where to write c#

Or copy link