1. What is Remote Validation in ASP.NET MVC5?
2. How to apply Remote Validation?
3. How to check input field instantly in asp.net form?
What is Remote Validation in ASP.NET MVC5?
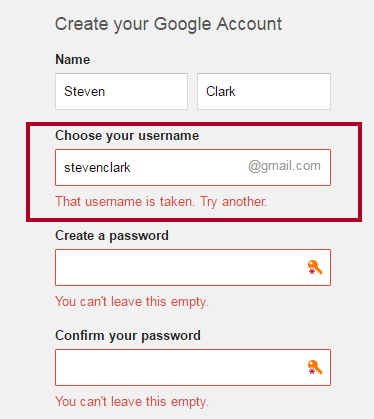
Remote Validation is a technique of validating only particular input field without posting the entire form to the server. It is very helpful for instant checking of an input field. You might notice this feature when creating an account in Gmail. As you jump out from the email input field, it instantly checks for existence email id and if it already found in the database, it suggests you choose another email id.
How to apply Remote Validation in ASP.NET MVC 5?
When you apply remote validation in asp.net MVC input field, this field will be able to update itself with respective action method. Here, I am taking an example of same like Gmail Account, and check whether the provided email id already exists or not.
Complete Programming Example for Remote Validation in ASP.NET MVC 5StudentModel.csusing System.Web.Mvc;
namespace RemoteValidation.Models
{
public class StudentModel
{
public string Name { get; set; }
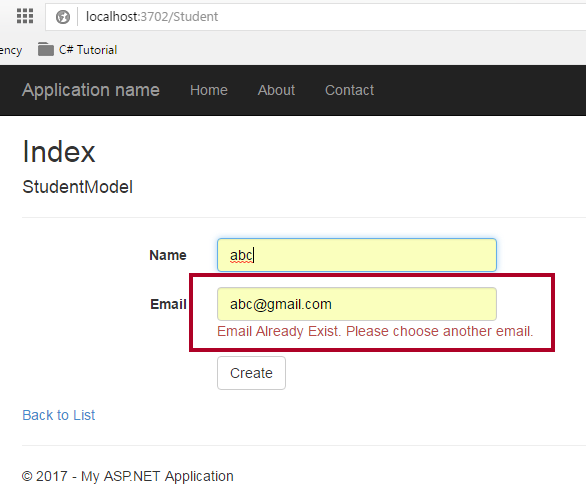
[Remote("IsEmailExist","Student", ErrorMessage ="Email Already Exist. Please choose another email.")]
public string Email { get; set; }
}
}
You can see that I have used Remote attribute just before the Email properties. I have used 3 parameters in this.
1. IsEmailExist is an action method which instantly check whether Email is already exist or not.
2. Student is a controller name.
3. ErrorMessage string returns the message if email matched.
StudentController.csusing System.Web.Mvc;
using RemoteValidation.Models;
namespace RemoteValidation.Controllers
{
public class StudentController : Controller
{
// GET: Student
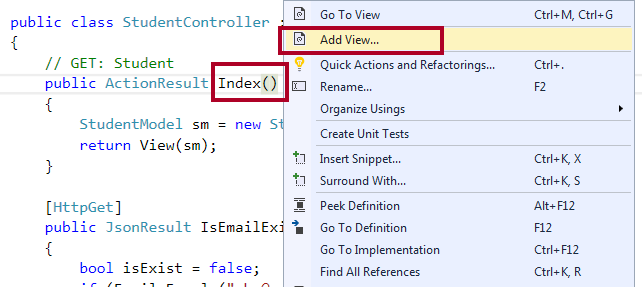
public ActionResult Index()
{
StudentModel sm = new StudentModel();
return View(sm);
}
[HttpGet]
public JsonResult IsEmailExist(string Email)
{
bool isExist = false;
if (Email.Equals("[email protected]"))
{
isExist = true;
}
return Json(!isExist, JsonRequestBehavior.AllowGet);
}
}
}
1. Index method returns the view of StudentModel.
2. IsEmailExist checks whether the mail exist or not.
StudentModel as shown in the picture below.
Here is my
Index.cshtml page.
@model RemoteValidation.Models.StudentModel

@{
    ViewBag.Title = "Index";
}

<h2>Index</h2>


@using (Html.BeginForm())
{
    @Html.AntiForgeryToken()

    <div class="form-horizontal">
        <h4>StudentModel</h4>
        <hr />
        @Html.ValidationSummary(true, "", new { @class = "text-danger" })
        <div class="form-group">
            @Html.LabelFor(model => model.Name, htmlAttributes: new { @class = "control-label col-md-2" })
            <div class="col-md-10">
                @Html.EditorFor(model => model.Name, new { htmlAttributes = new { @class = "form-control" } })
                @Html.ValidationMessageFor(model => model.Name, "", new { @class = "text-danger" })
            </div>
        </div>

        <div class="form-group">
            @Html.LabelFor(model => model.Email, htmlAttributes: new { @class = "control-label col-md-2" })
            <div class="col-md-10">
                @Html.EditorFor(model => model.Email, new { htmlAttributes = new { @class = "form-control" } })
                @Html.ValidationMessageFor(model => model.Email, "", new { @class = "text-danger" })
            </div>
        </div>

        <div class="form-group">
            <div class="col-md-offset-2 col-md-10">
                <input type="submit" value="Create" class="btn btn-default" />
            </div>
        </div>
    </div>
}

<div>
    @Html.ActionLink("Back to List", "Index")
</div>

@section Scripts {
    @Scripts.Render("~/bundles/jqueryval")
}
Summary
In this chapter, you learned how to use remote validation in ASP.NET MVC5 for instant checking of an input field. In the next chapter, you will learn the complete set of HTML Helper in ASP.NET MVC5.